The different configurations are detailed separately, and are
International Configuration

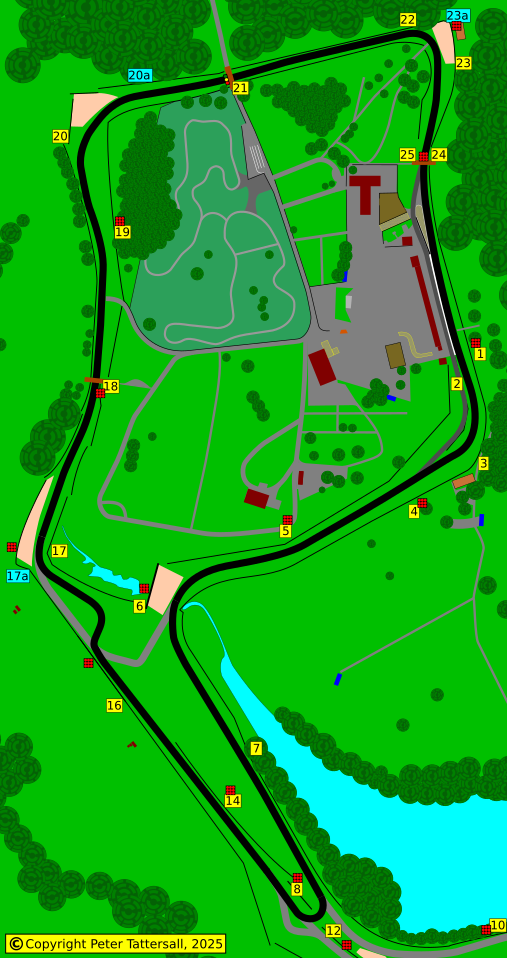
Not all marshal posts are necessarily in use. As a minimum, each post should be visible to the marshals at the next post, in both directions. For example, post 19 can see posts 18 and 20.
The green flag lap is a sighting lap and one of its intended uses is for the driver to learn the position of all manned posts.
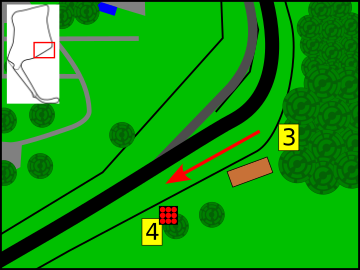
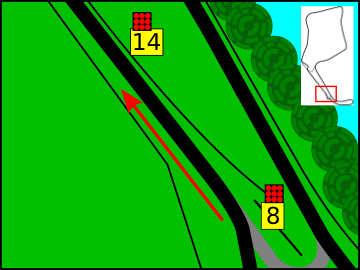
Above is a map of the circuit, showing the marshal posts for this configuration. Below, they are described in more detail.
Please note that the positions are a guideline only. Whilst every effort has been made to ensure accuracy, there may be mistakes or updates since the guide was created. Any feedback is appreciated.
In summary, while not guaranteeing perfection, I have identified the post positions along with repeater lights. Again, note that not all posts may be in use, while other posts may not have been used for flagging during my visits. Also, since writing, posts may have been moved or added. This is just a guide, but hopefully a useful guide.
 Marshal Post 1: Old Hall In Marshal Post 1: Old Hall InOn the left, on approach to the first corner. It is located just after and opposite the end of the concrete pit wall, where the armco begins. Repeater Lights There are lights directly attached to the post. |     |
| Marshal Post 2: Old Hall Grandstand On the right, just after and opposite the end of the concrete pit wall, where the armco begins. |     |
 Marshal Post 3: Old Hall Exit / Pit Lane Exit Marshal Post 3: Old Hall Exit / Pit Lane ExitTravelling alongside the pitlane, the lights can be seen directly ahead, centrally. The flag post is to the right of the lights, midway between them and the start of the grandstand. The post can be seen, on approach, be looking just to the inside of the corner apex. | 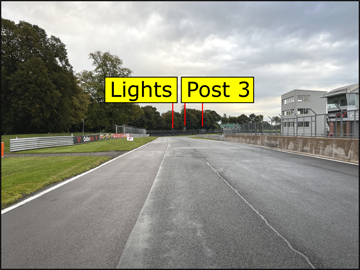  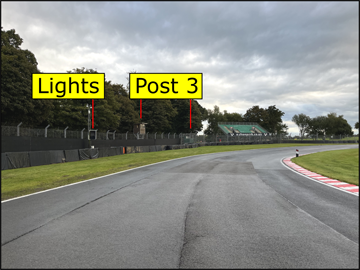 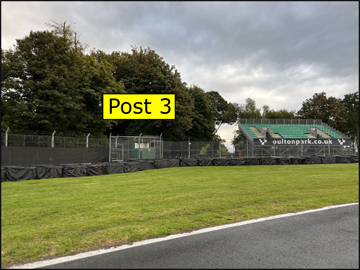 |
 Marshal Post 4: The Avenue Marshal Post 4: The AvenueOn the left, there is a post just after the pit exit lane. It is located at the end of the tyre wall, by the start of the armco. Repeater Lights These are at the marshal post. |    |
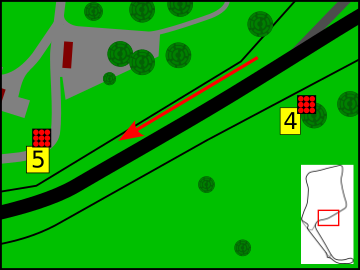 Marshal Post 5: The Avenue Marshal Post 5: The AvenueLocated on the inside of the circuit, to the right. It is immediately after the corner marker board, by the apex kerb. Repeater Lights Lights are attached to, and controlled by, this flag post. | 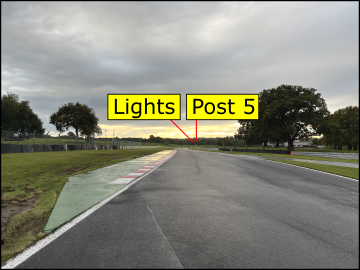 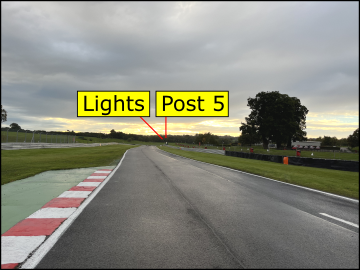 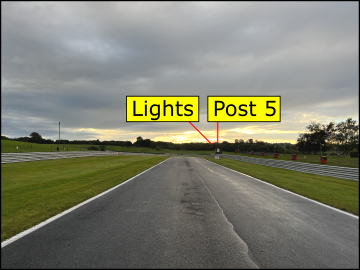 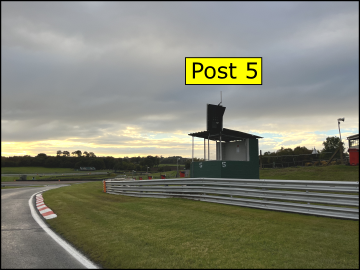 |
 Marshal Post 6: Cascades Marshal Post 6: CascadesHeading downhill, the circuit straightens before Cascades, the left-hander. Ahead can be seen a large gravel trap. The post is at the end of this, on the far-left corner. It can be seen, on approach, by looking across the corner apex, so it is likely to be spotted on turning in. Repeater Lights Lights are attached to, and controlled by, this flag post. |   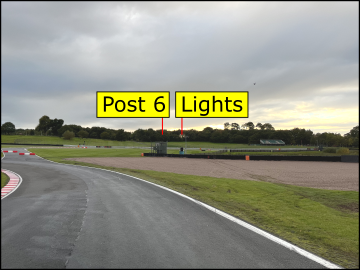  |
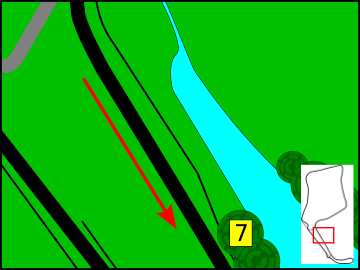 Marshal Post 7: Lakeside Marshal Post 7: LakesideThis is about a third of the way along the long straight that leads up to Island. Prior to this post, the armco barrier was set further back; it runs smoothly towards the circuit and gets to its closest point to the circuit immediately after this post. | 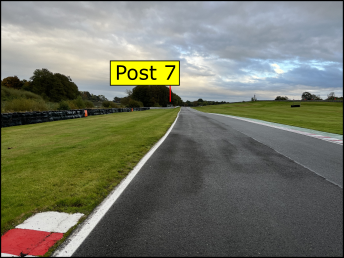  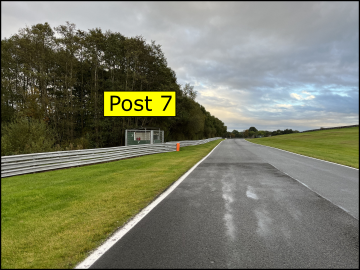 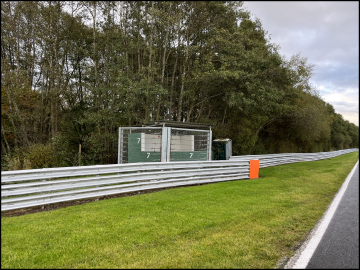 |
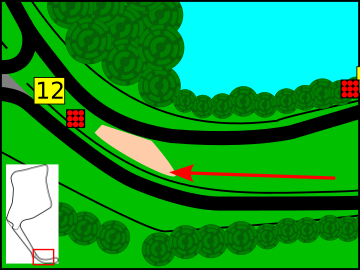
 Marshal Posts 8 and 12: Island Marshal Posts 8 and 12: IslandThis corner is a tight hairpin when using the Island configuration, but a fast left-hand sweep when on this, the International configuration. Post 8 There is a corner board on the left, followed by the Post 8 on the right. Post 12 This probably also goes under the name of Post 9. On the outside of the corner for Island is Marshal Post 12, which is usually the only post of these two that is manned when the International configuration is in use. It is used as a flag post for competitors travelling towards the hairpin, i.e. the direction in which we are currently concerned, and also for competitors returning from that hairpin. Repeater Lights Lights are alongside Post 8, which is on the return loop of this International extension. |     |
 Marshal Post 10: Shell In Marshal Post 10: Shell InOn the outside (left) just before the start of the hairpin. |    |
| Marshal Post 11: Shell Out Exiting the hairpin, this post is on the outside (left), just after the start of the exit kerbing. On approaching the post for Shell In, a glance to the right will give an early indication of waved flags at this post. |   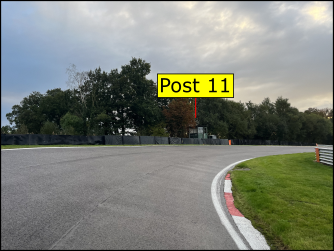  |
 Marshal Post 12: Britten's (Foulston's) Marshal Post 12: Britten's (Foulston's)On the right, after the curve and at the entry to the chicane. Repeater Lights A set of lights precede this post and is on the curve, just after a corner board. |  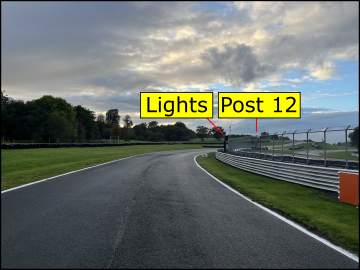 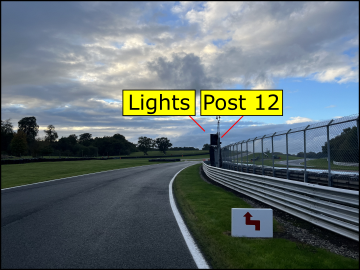 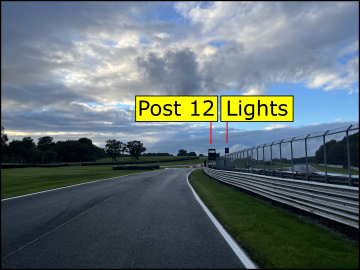 |
 Marshal Post 14: Hill Top Marshal Post 14: Hill TopSituated at the peak of the rise, on the right. It can be seen from the middle of the chicane, just, by looking slightly to the left of the exit apex. Repeater Lights Lights are attached to, and controlled by, this flag post. |   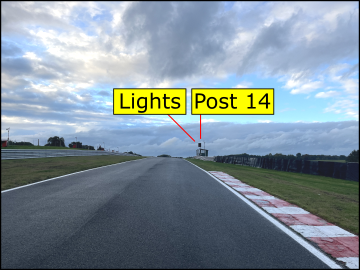 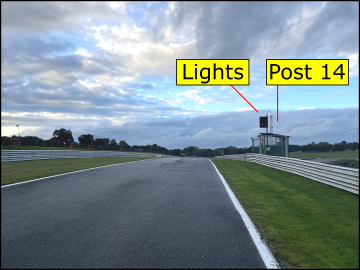 |
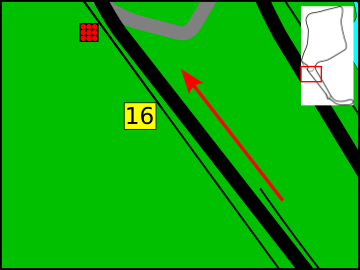 Marshal Post 16: Knickerbrook Approach Marshal Post 16: Knickerbrook ApproachOn the left, shortly before the turn in to the chicane. There are three countdown marker boards. The final is alongside this post. Repeater Lights On approach to Knickerbrook, these lights can be seen directly ahead, by the exit to the chicane. The lights are set up so that they are also clearly visible on approaching the next post. |     |
 Marshal Posts 17 and 17a Marshal Posts 17 and 17aKnickerbrook Entry and Exit It is a straight, downhill approach, with a set of repeater lights visible well before Post 16, being placed opposite the entry to the chicane. While still approaching the entry to the chicane and looking being the lights, an early glimpse of this post can be seen on the left, by the exit apex of the chicane. It is also at the exit of the escape road that would be taken if the entry speed into Knickerbrook had been too high, forcing the driver to go straight on. The marshal will likely report any driver failing to come to a brief full stop, thus mitigating any advantage of taking that escape road. Taking the first corner of the apex will take the driver’s focus away from the post and it will not come into view again until apexing the next corner, when both posts will be visible, the second on the inside of the exit apex. Repeater Lights The set of lights opposite the entry apex has already been mentioned. The next set of lights can be seen on exiting the middle of the chicane’s three apexes, visually midway between the two posts and straight on as the driver approaches the final apex. | 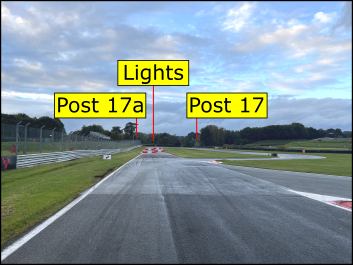 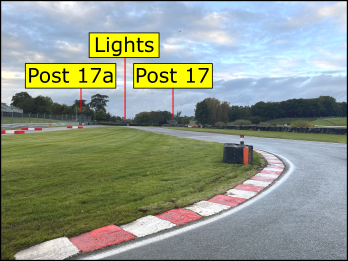 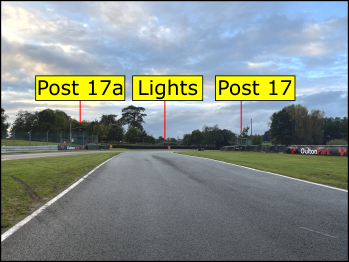 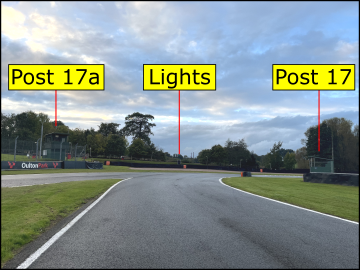 |
 Marshal Post 18: Clay Hill Marshal Post 18: Clay HillJust before the crest of the hill is a pedestrian bridge. The marshal post is underneath, to the right. Repeater Lights Lights are attached to, and controlled by, this flag post. | 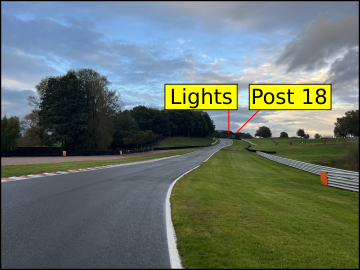 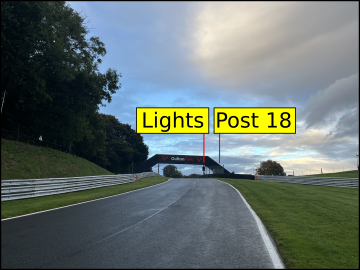 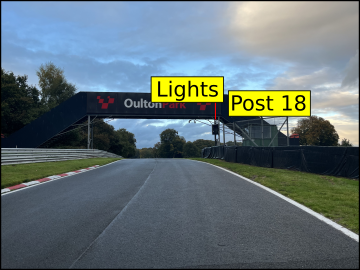  |
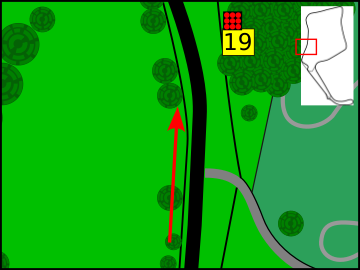 Marshal Post 19: Watertower Marshal Post 19: WatertowerThe circuit has a kink to the left. Just before this kink and after the turn-in point, to the right, is the marshal post. Passing under the pedestrian bridge, this post can be seen ahead by looking to the left of the track. There is a wide run-off here, so the driver will need to turn their head to monitor the post. Repeater Lights Lights are attached to, and controlled by, this flag post. | 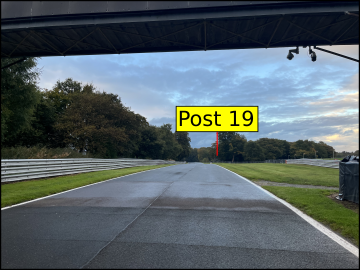  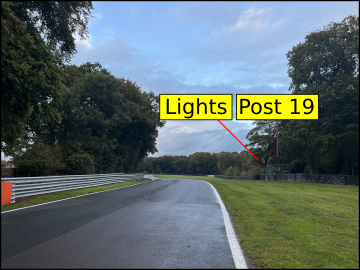  |
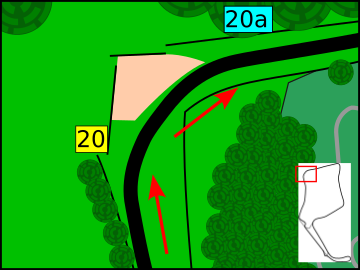 Marshal Post 20: Druids Marshal Post 20: DruidsOn the left, just after turning into the corner. The post is at the very end of the armco post. |   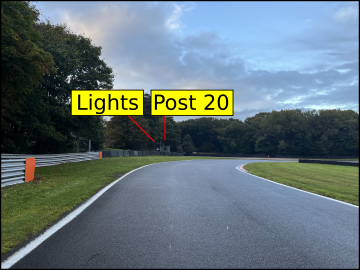  |
| Marshal Post 20A: Druids Exit On exiting Druids, the post can be seen ahead, on the left. |     |
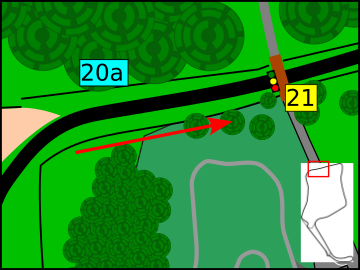 Marshal Post 21: Warwick Bridge Marshal Post 21: Warwick BridgeOn the right, immediately after the bridge. The post is hidden by the bridge and so will be difficult to spot early on, but the associated lights are very clear. Lights These are centrally mounted to the base of the bridge and should be very easy to observe. | 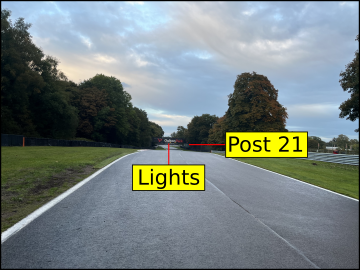  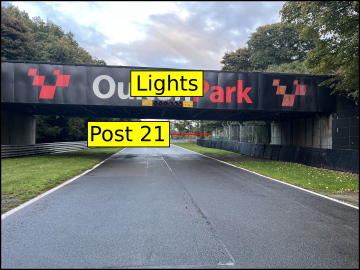 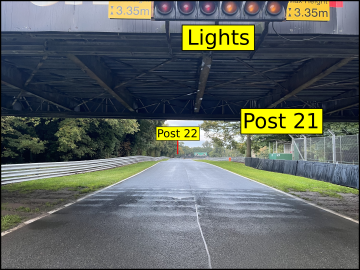 |
 Marshal Post 22: Lodge In Marshal Post 22: Lodge InOn the left, just before the corner entry. Repeater Lights Lights are seen directly ahead, to the left, at the far left corner of the gravel trap They are controlled by, this flag post. | 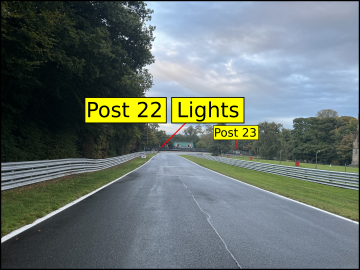 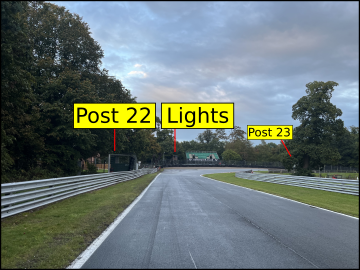  |
| Marshal Post 23: Lodge Out On the exit of this corner, by the far-right corner of the gravel trap. It will be visible by looking across the apex on turn-in, meaning it should easily fall into the driver’s eyeline as they negotiate the corner. | 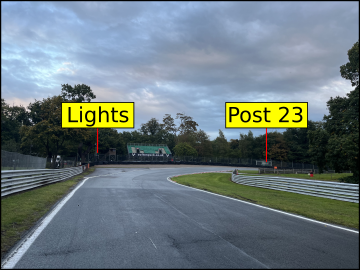  |
 Marshal Posts 24 and 25: Deer Leap Marshal Posts 24 and 25: Deer LeapAt the rise of the hill. The two posts are opposite each other, both before and next to the pedestrian bridge. Repeater Lights These are centrally mounted to the base of the bridge and are controlled by, post 25, on the right. |  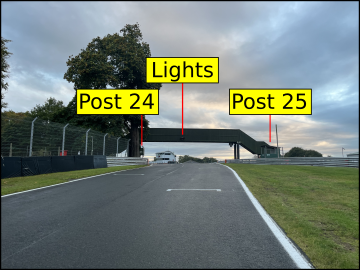 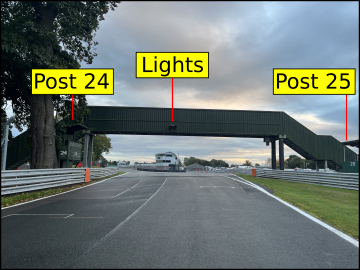 |
Go to guide for configuration:
Island Configuration
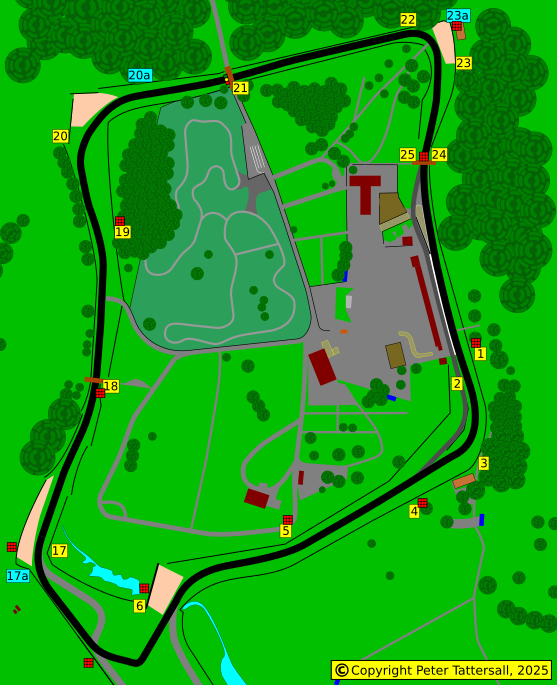
Not all marshal posts are necessarily in use. As a minimum, each post should be visible to the marshals at the next post, in both directions. For example, post 19 can see posts 18 and 20.
The green flag lap is a sighting lap and one of its intended uses is for the driver to learn the position of all manned posts.
Above is a map of the circuit, showing the marshal posts for this configuration. Below, they are described in more detail.
Please note that the positions are a guideline only. Whilst every effort has been made to ensure accuracy, there may be mistakes or updates since the guide was created. Any feedback is appreciated.
In summary, while not guaranteeing perfection, I have identified the post positions along with repeater lights. Again, note that not all posts may be in use, while other posts may not have been used for flagging during my visits. Also, since writing, posts may have been moved or added. This is just a guide, but hopefully a useful guide.
| Marshal Post 1: Old Hall In On the left, on approach to the first corner. It is located just after and opposite the end of the concrete pit wall, where the armco begins. Repeater Lights There are lights directly attached to the post. | |
| Marshal Post 2: Old Hall Grandstand On the right, just after and opposite the end of the concrete pit wall, where the armco begins. | |
| Marshal Post 3: Old Hall Exit / Pit Lane Exit Travelling alongside the pitlane, the lights can be seen directly ahead, centrally. The flag post is to the right of the lights, midway between them and the start of the grandstand. The post can be seen, on approach, be looking just to the inside of the corner apex. | |
| Marshal Post 4: The Avenue On the left, there is a post just after the pit exit lane. It is located at the end of the tyre wall, by the start of the armco. Repeater Lights These are at the marshal post. | |
| Marshal Post 5: The Avenue Located on the inside of the circuit, to the right. It is immediately after the corner marker board, by the apex kerb. Repeater Lights Lights are attached to, and controlled by, this flag post. | |
| Marshal Post 6: Cascades Heading downhill, the circuit straightens before Cascades, the left-hander. Ahead can be seen a large gravel trap. The post is at the end of this, on the far-left corner. It can be seen, on approach, by looking across the corner apex, so it is likely to be spotted on turning in. Repeater Lights Lights are attached to, and controlled by, this flag post. | |
| Marshal Post 7: Lakeside This is about a third of the way along the long straight that leads up to Island. Prior to this post, the armco barrier was set further back; it runs smoothly towards the circuit and gets to its closest point to the circuit immediately after this post. | |
 Marshal Posts 8 and 12: Island Marshal Posts 8 and 12: IslandThis corner is a tight hairpin when using the Island configuration, but a fast left-hand sweep when on this, the International configuration. Post 8 There is a corner board on the left, followed by the Post 8 on the right. Post 12 This probably also goes under the name of Post 9. On the outside of the hairpin is Marshal Post 12, which may the only post of these two that is manned. Repeater Lights Lights are alongside Post 8, which is on the return loop of this International extension. | |
 Marshal Post 14: Hill Top Marshal Post 14: Hill TopSituated at the peak of the rise, on the right. It can be seen from the middle of the chicane, just, by looking slightly to the left of the exit apex. Repeater Lights Lights are attached to, and controlled by, this flag post. |   |
| Marshal Post 16: Knickerbrook Approach On the left, shortly before the turn in to the chicane. There are three countdown marker boards. The final is alongside this post. Repeater Lights On approach to Knickerbrook, these lights can be seen directly ahead, by the exit to the chicane. The lights are set up so that they are also clearly visible on approaching the next post. | |
| Marshal Posts 17 and 17a Knickerbrook Entry and Exit It is a straight, downhill approach, with a set of repeater lights visible well before Post 16, being placed opposite the entry to the chicane. While still approaching the entry to the chicane and looking being the lights, an early glimpse of this post can be seen on the left, by the exit apex of the chicane. It is also at the exit of the escape road that would be taken if the entry speed into Knickerbrook had been too high, forcing the driver to go straight on. The marshal will likely report any driver failing to come to a brief full stop, thus mitigating any advantage of taking that escape road. Taking the first corner of the apex will take the driver’s focus away from the post and it will not come into view again until apexing the next corner, when both posts will be visible, the second on the inside of the exit apex. Repeater Lights The set of lights opposite the entry apex has already been mentioned. The next set of lights can be seen on exiting the middle of the chicane’s three apexes, visually midway between the two posts and straight on as the driver approaches the final apex. | |
| Marshal Post 18: Clay Hill Just before the crest of the hill is a pedestrian bridge. The marshal post is underneath, to the right. Repeater Lights Lights are attached to, and controlled by, this flag post. | |
| Marshal Post 19: Watertower The circuit has a kink to the left. Just before this kink and after the turn-in point, to the right, is the marshal post. Passing under the pedestrian bridge, this post can be seen ahead by looking to the left of the track. There is a wide run-off here, so the driver will need to turn their head to monitor the post. Repeater Lights Lights are attached to, and controlled by, this flag post. | |
| Marshal Post 20: Druids On the left, just after turning into the corner. The post is at the very end of the armco post. | |
| Marshal Post 20A: Druids Exit On exiting Druids, the post can be seen ahead, on the left. | |
| Marshal Post 21: Warwick Bridge On the right, immediately after the bridge. The post is hidden by the bridge and so will be difficult to spot early on, but the associated lights are very clear. Lights These are centrally mounted to the base of the bridge and should be very easy to observe. | |
| Marshal Post 22: Lodge In On the left, just before the corner entry. Repeater Lights Lights are seen directly ahead, to the left, at the far left corner of the gravel trap They are controlled by, this flag post. | |
| Marshal Post 23: Lodge Out On the exit of this corner, by the far-right corner of the gravel trap. It will be visible by looking across the apex on turn-in, meaning it should easily fall into the driver’s eyeline as they negotiate the corner. | |
| Marshal Posts 24 and 25: Deer Leap At the rise of the hill. The two posts are opposite each other, both before and next to the pedestrian bridge. Repeater Lights These are centrally mounted to the base of the bridge and are controlled by, post 25, on the right. | |
Go to guide for configuration:
Fosters Configuration
Not all marshal posts are necessarily in use. As a minimum, each post should be visible to the marshals at the next post, in both directions. For example, post 19 can see posts 18 and 20.
The green flag lap is a sighting lap and one of its intended uses is for the driver to learn the position of all manned posts.
Above is a map of the circuit, showing the marshal posts for this configuration. Below, they are described in more detail.
Please note that the positions are a guideline only. Whilst every effort has been made to ensure accuracy, there may be mistakes or updates since the guide was created. Any feedback is appreciated.
In summary, while not guaranteeing perfection, I have identified the post positions along with repeater lights. Again, note that not all posts may be in use, while other posts may not have been used for flagging during my visits. Also, since writing, posts may have been moved or added. This is just a guide, but hopefully a useful guide.
Posts 17 and 17A.
On my latest visit, whilst updating all other posts, I failed to take photographs for the cut-through from post 6 to here. I shall take fresh photographs on my next visit.
| Marshal Post 1: Old Hall In On the left, on approach to the first corner. It is located just after and opposite the end of the concrete pit wall, where the armco begins. Repeater Lights There are lights directly attached to the post. | |
| Marshal Post 2: Old Hall Grandstand On the right, just after and opposite the end of the concrete pit wall, where the armco begins. | |
| Marshal Post 3: Old Hall Exit / Pit Lane Exit Travelling alongside the pitlane, the lights can be seen directly ahead, centrally. The flag post is to the right of the lights, midway between them and the start of the grandstand. The post can be seen, on approach, be looking just to the inside of the corner apex. | |
| Marshal Post 4: The Avenue On the left, there is a post just after the pit exit lane. It is located at the end of the tyre wall, by the start of the armco. Repeater Lights These are at the marshal post. | |
| Marshal Post 5: The Avenue Located on the inside of the circuit, to the right. It is immediately after the corner marker board, by the apex kerb. Repeater Lights Lights are attached to, and controlled by, this flag post. | |
 Marshal Post 6: Cascades Marshal Post 6: CascadesHeading downhill, the circuit straightens before Cascades, the left-hander. Ahead can be seen a large gravel trap. The post is at the end of this, on the far-left corner. It can be seen, on approach, by looking across the corner apex, so it is likely to be spotted on turning in. Repeater Lights Lights are attached to, and controlled by, this flag post. | |
 Marshal Posts 17 and 17a Knickerbrook Having turned sharp right and then slight right, there is a post ahead, on the left, just as the track starts to curve to the right again. There is a second post opposite, on the corner apex. The post will be difficult to spot early as, initially, the driver is heading away from it. Repeater Lights Having turned the sharp right and then the slight right, as described above, the lights are straight ahead, to the left. | |
| Marshal Post 18: Clay Hill Just before the crest of the hill is a pedestrian bridge. The marshal post is underneath, to the right. Repeater Lights Lights are attached to, and controlled by, this flag post. | |
| Marshal Post 19: Watertower The circuit has a kink to the left. Just before this kink and after the turn-in point, to the right, is the marshal post. Passing under the pedestrian bridge, this post can be seen ahead by looking to the left of the track. There is a wide run-off here, so the driver will need to turn their head to monitor the post. Repeater Lights Lights are attached to, and controlled by, this flag post. | |
| Marshal Post 20: Druids On the left, just after turning into the corner. The post is at the very end of the armco post. | |
| Marshal Post 20A: Druids Exit On exiting Druids, the post can be seen ahead, on the left. | |
| Marshal Post 21: Warwick Bridge On the right, immediately after the bridge. The post is hidden by the bridge and so will be difficult to spot early on, but the associated lights are very clear. Lights These are centrally mounted to the base of the bridge and should be very easy to observe. | |
| Marshal Post 22: Lodge In On the left, just before the corner entry. Repeater Lights Lights are seen directly ahead, to the left, at the far left corner of the gravel trap They are controlled by, this flag post. | |
| Marshal Post 23: Lodge Out On the exit of this corner, by the far-right corner of the gravel trap. It will be visible by looking across the apex on turn-in, meaning it should easily fall into the driver’s eyeline as they negotiate the corner. | |
| Marshal Posts 24 and 25: Deer Leap At the rise of the hill. The two posts are opposite each other, both before and next to the pedestrian bridge. Repeater Lights These are centrally mounted to the base of the bridge and are controlled by, post 25, on the right. | |
Go to guide for configuration:
Buy the PDF
This Marshal Post Guide is available as a downloadable PDF at a very reasonable price. Click the thumbnail to view it in the store.
A Complete Guide of this venue is also available, which includes all of the above guides. Click the thumbnail to view it in the store.
You can also click this thumbnail to view all the available PDFs in the shop.
Page updated by Peter Tattersall, November 2025