My personal favourite spectating point is [2] in the notes. It overlooks Hollywood, while taking in views of Redgate all the way to Old Hairpin. In a short period of sunshine I sat at a table at the right-hand base of the grandstand, considering that raised location being the best spot of all. Or you could try the grandstand. I went up it just to take a couple of photographs, only for a friendly marshal to point out that there was a £10 entry fee. Once my tight northern heart restarted, I apologised and left.
Behind this grandstand was a toilet block and, for this truck meeting, there were, in a separate area, several food stalls.
I was able to walk (or run) all the way round to Coppice, but no further on the outside of the circuit. I was able to go through a tunnel and then travel the length of the inner perimeter.
Also at Coppice was a parking area specifically for the disabled. This had great views of the circuit, from McLeans to Coppice.
| 1: Redgate | |
| Starting from the North Western point of the paddock, looking at Marshal Post 1, which overlooks Redgate. |  |
| The path takes the spectator to the very edge of Redgate’s run-off. |  |
| A view of the exit. |  |
| The start line can be seen. |  |
| As can the exit. The grandstand overlooking Hollywood is in the distance. |  |
| 2: Hollywood and Grandstand | |
| Approaching the grandstand. The hill below is restricted during truck meetings, hence the temporary fencing. At the bottom is a gap that will be closed during the truck events, with all spectators being removed before the start. |  |
| At the back of the grandstand is a toilet block, while on the other side are food vans. |  |
| Fantastic views from the grandstand, but it can cost £10. |  |
| Almost as good a view from just below the grandstand, and this is free! |  |
| 3: Old Hairpin | |
| The short walk to Old Hairpin, with a toilet block opposite the marshal post. | 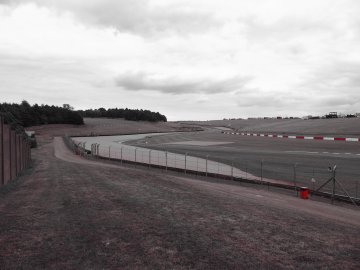 |
| The toilet block opposite the marshal post. |  |
| View approaching Old Hairpin. |  |
| View exiting Old Hairpin, with the old bridge in the background. |  |
| 4: Starkey’s Bridge | |
| The bridge can be seen ahead. |  |
| The view from Starkey’s Bridge. |  |
| Overlooking Starkey’s Bridge and Old Hairpin. |  |
| View of Schwantz Curve and towards McLeans Corner. | 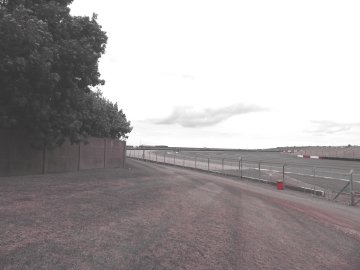 |
| 5: McLeans Corner | |
| Just past Schwantz Curve, looking towards McLeans Corner. |  |
| There is a toilet block by McLeans Corner. |  |
| Looking back from the exit of McLeans Corner. |  |
| Looking forward from the exit of McLeans Corner. |  |
| 6: Disabled Parking by Coppice In | |
| I was unaware of this area until I arrived at it, as part of my spectating photography, and I was unable to find out details of how to access it. There is a gate behind the Coppice marshal post and I believe that arrangements need to be made for this to be unlocked. Once in, this is the entry. |  |
| It is a large area with portable toilet facilities. |  |
| The view back towards McLeans is good. |  |
| The view of Coppice itself is excellent. |  |
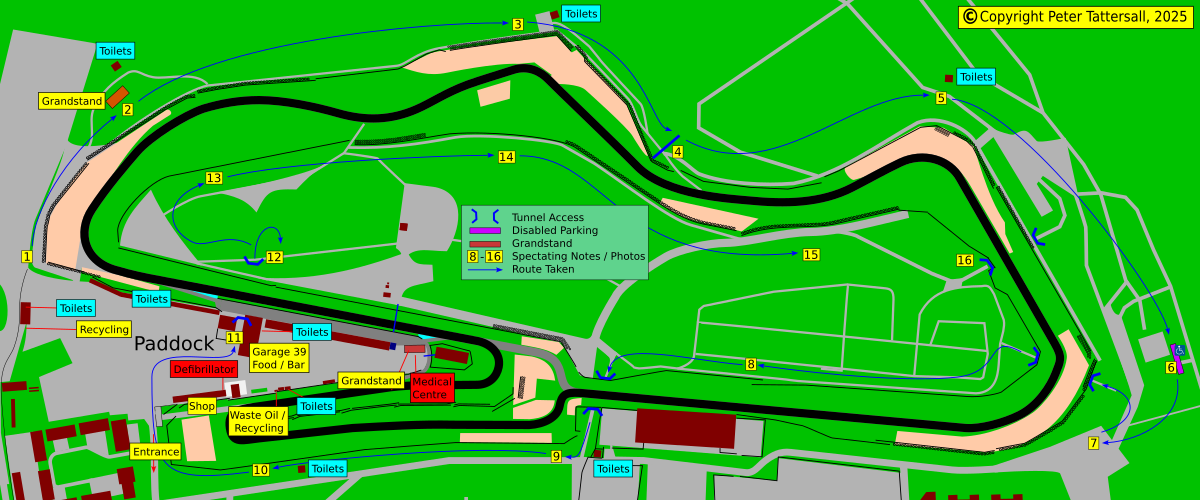
| 7: Coppice | |
| This isn’t the greatest of views, through an access road to the circuit. |  |
| Another not ideal view. The previous hilltop views spoilt us. Perhaps Coppice is a little too far away … |  |
| … especially as you can go no further … |  |
| … unless you go under the pedestrian tunnel to the infield. |  |
| 8: Coppice, Down to the Esses | |
| Midway between Coppice and the Esses, the viewing isn’t worth the long trudge. |  |
| Further down, there is a gap allowing a clearer view, which is fine for a few minutes. The chicane isn’t too far way, so it may be worth watching from here. |  |
| This is a better viewing point, especially if the National configuration is in use, as it is raised. The tunnel into the Melbourne Loop can be seen. |  |
| 9: Fogarty’s Esses | |
| Having taken the tunnel into the Melbourne Loop, this is the view from Fogarty’s Esses. The sloping grass on the far left drops down to the path to the tunnel. |  |
| This toilet block is opposite the tunnel entrance. |  |
| This view is from further round Fogarty’s Esses. |  |
| Looking at Fogarty’s Esses from the exit. |  |
| 10: Fogarty’s Esses to the Melbourne Hairpin | |
| The area towards the hairpin has a grassy area that isn’t very wide, but is raised for a good view. There is also a toilet block. |  |
| A good view of the Melbourne Hairpin. |  |
| Looking left from the end of this bank and you see the entrance. |  |
| Leaving the banking, the return to the paddock can be delayed by watching the action from the hairpin’s apex. |  |
| 11: Paddock Infield Tunnel | |
| From the Melbourne Hairpin, enter the paddock and turn right, to walk diagonally across to the left-side of Garage 39. Between there and Scrutineering is a tunnel that gains access to the infield. |  |
| Any spectators on a bicycle will need to dismount. |  |
| On the infield, there are steps to the left of the tunnel entry leading up to the start/finish straight. |  |
| 12: Wheatcroft Straight | |
| Looking back along Wheatcroft Straight, towards Roberts chicane. |  |
| The view towards the first corner, Redgate. |  |
| Quite a good view of Redgate’s apex. |  |
| 13: Hollywood | |
| A nicely elevated viewpoint, if not quite as good as the opposite side of the track. It’s likely to be less busy. |  |
| It is a better view the other way, towards Craner Curves. |  |
| 14: Old Hairpin | |
| A very high vantage point of Craner Curves, albeit further away from the action. |  |
| A clear view of the hairpin |  |
| From the hairpin, you can see all the way to Schwantz Curve. |  |
| 15: Shwantz Curve | |
| A great view back to Old Hairpin. |  |
| Looking forward at McLeans |  |
| 16: Coppice | |
| Not a spectacular view of the straight, from McLeans, with the vehicular tunnel in the centre. |  |
| Again, not an impressive view, with Coppice and the pedestrian tunnel barely visible on the far-centre-right. |  |
Buy the PDF
This Spectator Guide is available as a downloadable PDF at a very reasonable price. Click the thumbnail to view it in the store.

A Complete Guide of this venue is also available, which includes all of the above guides. Click the thumbnail to view it in the store.
You can also click this thumbnail to view all the available PDFs in the shop.
Page updated by Peter Tattersall, August 2025