This page details all the places a driver needs to take themselves or their car over a race weekend.
Each major section can be reached by the following links:
Main Paddock

| 1. Hailwoods Café / Bar At the very bottom of the paddock close to the grandstand, is the café and bar. Trackside of the café is an outdoor seating area. In this area, during major meetings, are fast food outlets. |  |
| 2. Tunnel and Scrutineering / Toilets From Hailwood café bar, head back uphill alongside the circuit. Passing through the gates into the upper paddock, the tunnels to the paddock are on the left, with the Scrutineering Bay on the right. The Scrutineering Bay also has toilet and shower facilities. |  |
| 3. Scrutineering / Toilets The Scrutineering Bay is on the left, with the toilet and shower facilities being entered from the right end. Parc Ferme is the open area to the left of the Scrutineering Bay. |  |
| 4. Paddock Office The Paddock Office is between the Scrutineering Bay and the toilets. The area at the front is for measuring ride height. It can also be used as a level. |  |
Each major section can be reached by the following links:
Tunnels

Tunnel from Main Paddock to Pit Paddock
From the lower paddock, head up the hill and turn off through a gate opposite the scrutineering bay and toilets.
Take the left lane as this is for access to the pit area, whereas the right lane is for egress. The left tunnel is also a pedestrian tunnel, so take care.
At the very bottom of the paddock close to the grandstand, is the café and bar.
| 1. Tunnel Approach, from Main Paddock This gate is usually has security against it, but that is mainly for tunnel safety, rather than to exclude visitors. During truck meetings, this tunnel is closed while trucks are on-circuit, or about to go out. Pedestrians must stay to the left. When returning from the paddock, for parc ferme, cross the road. The barrier to the right of the photograph is a little below scrutineering and parc ferme. It is straight on, down the hill for the paddock. |  |
| 2. Tunnel Entry, from Main Paddock Stay left for entry to the tunnel. The right lane is for vehicles only, returning from the pit area. Pedestrians travelling in either direction must use the left tunnel. The pavement is narrow and so care is needed, especially when passing other pedestrians in the opposite direction, as someone will have to leave the pavement, preferably those facing the traffic. Vehicles need to be especially careful of pedestrians and remember that children in particular may not have common sense, especially if excited. |  |
| 3. Tunnel Exit There is a bend in the tunnel. The exit straightens up. At the end, bear left for the back of the garages. This also leads to the assembly areas. Do not go to the right, as that is the pit lane and pit exit. |  |
Tunnel from Pit Paddock to Main Paddock
The entry to the lane leading up to the tunnel is opposite Race Control. Take the left lane. This is not suitable for pedestrians, who must use the right-hand tunnel. Beware that the tunnel has tight bends and is lower than that which leads from paddock to pits.
| 4. Tunnel Approach, from Pits Paddock This photograph shows a circuit maintenance vehicle by the pit lane exit, with the route onto the circuit closed off. Cars can return to the main paddock from the pit lane by taking the left lane, on the right. Vehicles from the pit paddock can also return to the main paddock. Note the right lane states NO EXIT. Also note the pedestrians and the narrowness of the pavement. |  |
Pedestrian Tunnel by Race Control
The entry to the lane leading up to the tunnel is opposite Race Control. Take the left lane. This is not suitable for pedestrians, who must use the right-hand tunnel. Beware that the tunnel has tight bends and is lower than that which leads from paddock to pits.
| 5. Pedestrian Tunnel Approach, from Pits The pedestrian tunnel entry is in front on the control centre, between pit lane and pit paddock. |  |
| 6. Tunnel Exit, from Pits Exiting the tunnel will provide the spectator with an excellent view of the main straight, behind the Brabham Stewart suite. At the end, turn right to pass a grandstand into the upper paddock area. |  |
| 7. Tunnel Approach, from Grandstand Return to the pit area by walking by the back of the Brabham Stewart suite, located just after the start line. Head down these stairs and travel along the long tunnel, before heading back up to just in front of the Control Centre. |  |
Each major section can be reached by the following links:
Pit Paddock

For vehicular traffic, the pit paddock can only be reached from the tunnel leading from the outer paddock. The passage along this area from the tunnel to the Assembly Area is narrow, and can be narrower when busy, so care is required.
The Control Centre and associated administrative functions are all accessed at the start of the pit paddock, centred around the large, rounded glass tower, topped with red Bands Hatch signage.
At the other end of the paddock are the assembly areas for both race and test days. This area also includes a smaller scrutineering bay.
| 1. Pit Paddock Entry From the tunnel access, go to the left for the pit paddock. Do not go to the right, as that is the pit lane and pit exit. The Control tower is the rounded glass tower, topped with red Bands Hatch signage. |  |
| 2a. Race Control Race Control is visible to the top-right of this photograph. Between Race Control and the square metal tower is access to Race Control and also to toilets. Race Control is also, more usually, accessed from the entrance to the left of the metal tower. |  |
| 2b. Race Control Access This is the preferred access. Race Admin is on the other side of the entrance. All required information can be sought here. |  |
| 2c. Food Outlet To the left of Race Control, down some steps, is a friendly hot-food outlet with limited seating. |  |
| 2d. Media Centre To the right of the fast food outlet, separated by a couple of garages, is the Media Centre. |  |
| 3. Pit Paddock Entry to Assembly Area On the other side of the pit paddock, at the end of the garages, are two assembly areas, one for racing, the other for testing that can also be used as a parc ferme, along with scrutineering. As can be seen here, it can be very narrow. People who should now better often can be too arrogant, or so it seems, to look where they are going. Competitors may be driving in both directions. If close to the start of a session, a driver may have realised that they have left something behind and so will be rushing back, usually carefully. |  |
| 4a. Assembly Area / Parc Ferme This area is usually used as a holding area during non-official sessions, such as testing or track days. It the far corner, by the exit gate, is Garage 34, which has weighing scales in it that may be of use to competitors during testing. This area can also be used as parc ferme during races. |  |
| 4b. Assembly Area Exit This gate, alongside Garage 34, is where cars are directed from the Assembly Area into the pit lane. |  |
| 4c. Garage 34 Located opposite the entrance, by the exit gate, this is the last garage in the block. It contains weighing scales, which may be of use to competitors during testing. The would also be used when this area is used as parc ferme. |  |
| 4d. Assembly Area Exit Cars are directed from the Assembly Area into the pit lane. |  |
| 5a. Main Assembly Area Entry Especially during a race, and usually qualifying, this area is used as the Assembly Area. Note the numbers against the fences. These denote race starting positions against which each driver is directed. They can then be released in grid order. |  |
| 5b. Main Assembly Area Exit Cars are lined up against the fence in grid order, with the starting position noted against the fence. which each driver is directed. The top ten are ranged against the fence that runs alongside the pit entry lane, with pole position being in the leftmost place. Cars are released into the pit lane through the gate at the right of this photograph. |  |
Each major section can be reached by the following links:
Pit Lane and Grid

Pit Lane, Including Entry and Exit
Pit Lane Entry
For official sessions, accessing the pit lane is via the Assembly Area. If a driver is late, then access is from between the Assembly Area gate and the end of the pit lane garages.
From the circuit, the pit entry is towards the end of Clearways, the final corner, opposite the end of the Grandstand. This is a fast, sweeping right-hander, so raise a hand to indicate that you are slowing and pitting. Having entered the pit entry lane you will need to slow down in order to negotiate the tight chicane that is alongside the near-end of the Assembly Area.
Immediately after the chicane, the 60 kph (37.28 mph) speed limit begins.
Pit Exit
At the end of the pit lane, alongside Race Control, is a slight chicane that leads onto the pit lane exit. On joining the circuit, stay to the right, off the racing line. Be aware that cars may be on circuit at racing speed and expect them to sweep by at any point through the first corner.
| 1. Pit Lane Approach The approach is from Clearways, a fast, sweeping right-hander, so raise a hand to indicate that you are slowing and pitting. |  |
| 2. Pit Lane Entry It is a fast entry, but you will need to immediately slow, in order to negotiate the tight chicane ahead. |  |
| 3. Pit Lane Entry Chicane The entry chicane is a considerable obstacle to speed. |  |
| 4. Entry to the Pit Lane Immediately after the chicane is the pit lane. The white live straight after the red and white plastic blocks denotes the start of the 60kph speed limit – that’s 37.28mph. Take care of cars potentially exiting the assembly area between here and the start of the garages. |  |
| 5. Pit Lane Here, Caterhams have just been released at the start of their qualifying session. |  |
| 6. Pit Lane Exit On passing the pit garages, there is an exit to the right for the paddock. At the end of the session, marshals will direct drivers in that direction. The entry to the tunnel access lane can be seen to the right. During a live session, drivers will be allowed on-circuit via this exit lane. The speed limit ends on passing this solid line. |  |
| 7. Pit Lane Exit to Circuit Stay right and do not cross the while line that separates the pit exit lane from the main circuit. Drivers can use all the circuit, providing it is safe to do so, once passing the white line that crosses the circuit. Be aware that, if other cars are on circuit, they may be staying left to allow a faster driver by, or diving to the left to pass another driver on the inside of Paddock Hill Bend. |  |
Grid

Starting Grid – Rear
The rear of the starting grid is as Clark Curve becomes the start finish straight, just as the pit lane begins.
Starting Grid – Front
The front of the grid is just before the end of the garages / the start of Race Control. It is alongside, to the left, the end of the grandstand.
Starting Lights
The starting lights are located on a gantry above the right side of the track, opposite the start of the next grandstand.
| 1. Grid Approach As per the pit lane entry, the approach is from Clearways, a fast, sweeping right-hander. Marshals will invariably be on-hand to guide competitors to their starting position, with the back of the grid being just beyond the pit lane entry. | |
| 2. Grid, from Towards the Back The grid is on a curve, with the start lights difficult to see, way ahead on the inside of the track. From here, the grid is downhill and cambered to the right. Further ahead, the grid gently levels out before rising towards the front. |  |
| 3. Grid, from Towards the Front The grid straightens out, with the start lights easy to see. From here, the grid level is starting to raise, still cambered towards the right. |  |
| 4. Pole Position and Start Lights This photograph from pole position, looking at the starting lights. |  |
Each major section can be reached by the following links:
Children’s Play Area
There is an area for children to enjoy themselves behind the Kentagon.
| 5. Clearways Approach Walking, or driving, towards the venue exit. You will see the Motorsport Vision Centre ahead, by Clearways. Just after passing this building, turn left and head towards the bridge that crosses the circuit. |  |
| 6. Clearways Approach Continue, on towards and over the bridge, where the Medical Centre is located. | 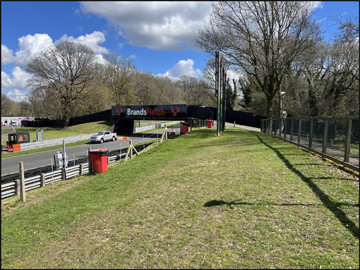 |
| 7. Cross the Bridge Beware of oncoming traffic. The Medical Centre is just over the bridge, to the left. |  |
| 8. Other Side of Bridge The Medical Centre can be seen, to the left. |  |
| 9. Medical Centre Enter here for the Medical Centre. |  |
| 10. Medical Centre Main Entrance The main entrance can be seen with a big red sign above it. |  |
Each major section can be reached by the following links:
First Aid / Medical Centre

First Aid
I understand that, during major race events, first aid is available from close to the Kentagon, on the other side of the children’s playground. The Kentagon is located across the road from the grandstand that overlooks the first corner, Paddock Hill Bend.
From the Pits Paddock
Head towards Race Control where you will see a tunnel. Be aware that, on returning, you may be asked to present your pass. You will exit the tunnel at the start line grandstand.
Turn right and walk by the shops and then the grandstand, on the right.
Bear left as you pass the Kentagon restaurant on the left and then children’s playground. First Aid is now on the left.
From the Lower Paddock
Head uphill to the top left corner exit of the upper paddock. On exiting, turn right, passing the Kentagon restaurant and then children’s playground, both on the left. First Aid is now on the left.
| 1. Kentagon The Kentagon is opposite, in a North-Easterly direction, the grandstand overlooking the entry into the first corner of the circuit, Paddock Hill Bend. To the right is the route past the Kentagon, via the children’s play area, to the First Aid centre. |  |
| 2. Bypass the Kentagon Pass the front of the Kentagon, going straight on here, via the children’s play area, to the First Aid centre. |  |
| 3. Children’s Play Area Immediately after the Kentagon is the children’s play area. The First Aid centre can be seen ahead. |  |
| 4. First Aid Centre Turn left into the First Aid centre. |  |
Medical Centre, Via Clearways
Walking, from the Pits Paddock
Head towards Race Control where you will see a tunnel. Be aware that, on returning, you may be asked to present your pass. You will exit the tunnel at the start line grandstand.
Turn left and walk by the perimeter of the circuit, passing the hospitality suite at Clearways. Continue alongside the circuit until you reach a bridge which crosses the GP circuit. The Medical Centre is over that bridge, straight ahead.
Driving, via the Shops, from the Lower Paddock
Drive as though leaving the circuit. At a crossroads just before the entry booths, with a car park on the left, turn left.
Continue until a bridge which crosses the GP. If driving over the bridge, be very careful of oncoming traffic. The Medical Centre is just over the bridge, to the left.
From the Lower Paddock
It is a shorter distance to get to the Medical Centre via Druids and the GP circuit, but that is a steeper, more athletic and more complicated journey. It is also quieter, in terms of meeting other people, an important consideration if calling for help may become a necessity. Aside from the considerable uphill journey via Paddock Hill, going to the Medical Centre via the shops and Clearways is, in general, more advisable.
Head uphill, through the gates and, with the Kentagon opposite, turn left by the grandstand.
Walk by the perimeter of the circuit, passing the hospitality suite at Clearways. Continue alongside the circuit until you reach a bridge which crosses the GP circuit. The Medical Centre is just over the bridge, to the left.
| 5. Clearways Approach Walking, or driving, towards the venue exit. You will see the Motorsport Vision Centre ahead, by Clearways. Just after passing this building, turn left and head towards the bridge that crosses the circuit. | |
| 6. Clearways Approach Continue, on towards and over the bridge, where the Medical Centre is located. | |
| 7. Cross the Bridge Beware of oncoming traffic. The Medical Centre is just over the bridge, to the left. | |
| 8. Other Side of Bridge The Medical Centre can be seen, to the left. | |
| 9. Medical Centre Enter here for the Medical Centre. | |
| 10. Medical Centre Main Entrance The main entrance can be seen with a big red sign above it. | |
Medical Centre on Foot, Via Druids and the GP Circuit
It is a shorter distance to get to the Medical Centre via Druids and the GP circuit, but that is a steeper, more athletic and more complicated journey. It is also quieter, in terms of meeting other people, an important consideration if calling for help may become a necessity. Aside from the considerable uphill journey via Paddock Hill, going to the Medical Centre via the shops and Clearways is, in general, more advisable.
The journey starts by walking up from the paddock up to Druids, continuing in the same direction past the toilet block towards the bridge that crosses the GP circuit. Cross that bridge and, on the other side, turn right. Stay on that path all the way to the Medical Centre, which will be on the right.
| 11. Head Towards Druids From the paddock, walk towards Druids, passing the spectator bridge. |  |
| 12. Druids At Druids, continue in the same direction, passing the toilet block. |  |
| 13. Toilet Block Pass the toilet block and head towards the bridge. |  |
| 14. Bridge Cross the bridge. |  |
| 15. Other Side of Bridge On the other side, turn right. |  |
| 16. Stay on the Path Stay on that path all the way to the Medical Centre, which will be on the right. |  |
| 17. Medical Centre Ahead The Medical Centre is ahead, on the right. |  |
| 9. Medical Centre Enter here for the Medical Centre. | |
| 10. Medical Centre Main Entrance The main entrance can be seen with a big red sign above it. | |
Each major section can be reached by the following links:
Buy the PDF

This Paddock Tour is available as a downloadable PDF at a very reasonable price. Click the thumbnail to view it in the store.

A Complete Guide of this venue is also available, which includes all of the above guides. Click the thumbnail to view it in the store.
You can also click this thumbnail to view all the available PDFs in the shop.
Page updated by Peter Tattersall, August 2025