The different configurations are detailed separately, and are
You can download a pdf version of this page here:
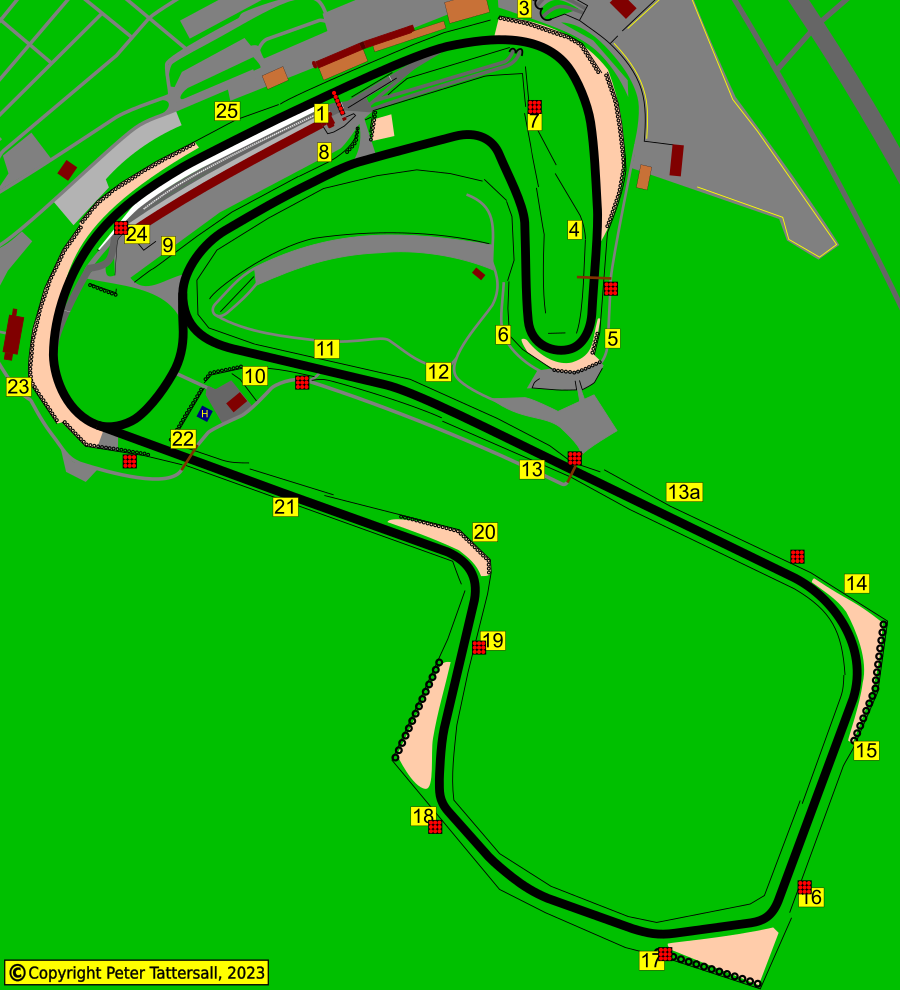
Indy Configuration

Not all marshal posts are necessarily in use. As a minimum, each post should be visible to the marshals at the next post, in both directions. For example, Post 5 can see posts 4 and 6.
The green flag lap is a sighting lap and one of its intended uses is for the driver to learn the position of all manned posts.
Above is a map of the circuit, showing the marshal posts for this configuration. Below, they are described in more detail.
Please note that the positions are a guideline only. Whilst every effort has been made to ensure accuracy, there may be mistakes or updates since the guide was created. Any feedback is appreciated.
In summary, while not guaranteeing perfection, I have identified the post positions along with repeater lights. Again, note that not all posts may be in use, while other posts may not have been used for flagging during my visits. Also, since writing, posts may have been moved or added. This is just a guide, but hopefully a useful guide.
 Marshal Post 1: Start / Finish Line On the left, at the very end of the concrete section of the pit wall, by the second of two white lines that cross the circuit. Just ahead, atop a gantry, are the start lights. |  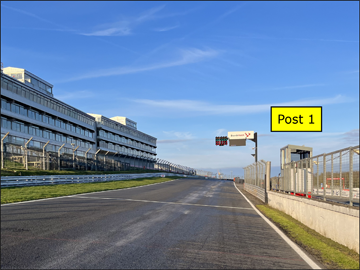 |
 Marshal Post 3: Paddock Hill Bend Opposite the pit lane exit is the marshal post’s repeater lights. The post itself is a very short distance later, on the same (left) side and just over the brow of the hill It is at the start of the gravel trap. Visually, the driver’s focus will be towards the apex of Paddock Hill Bend, so take care to spare a moment to look left. |    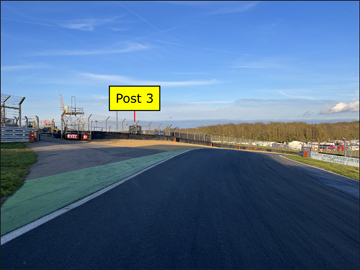 |
 Marshal Post 4: Hailwoods Hill Having exited Paddock Hill Bend, there is an expanse of grass on the right. The post is located where the armco returns to by the track. |    |
 Marshal Post 5: Druids Entry On passing under the bridge, the next post can be seen ahead, on the left, at the end of the armco. This is by the turn-in point. Marshal post’s repeater lights are located to the left, just after the bridge. |   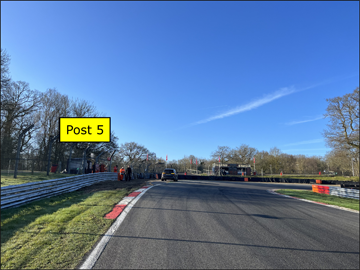 |
Marshal Post 6: Druids Exit Rounding Druids, the Post 6 is opposite Post 5. It can be seen ahead from the apex of Druids. It is on the outside of the circuit. |    |
 Marshal Post 7: Graham Hill Bend Exiting Druids, this post can be clearly seen at the bottom of the hill, to the right of the track. It is opposite the entry to Graham Hill Bend. By the marshal post is a red flag repeater light. |   |
 Marshal Post 8: Cooper Straight Exiting Graham Hill Bend and looking ahead, there is an access road to the right. Beyond that, opposite the entry to the left-hand curve, is this post. |    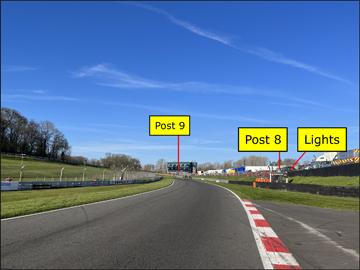 |
 Marshal Post 9: Surtees Entry Heading towards Surtees, this post can be seen in the distance, on the right. It is positioned after the circuit starts to bend to the left so, even though it is by the armco, it is set back a little. It is opposite the point where the apex kerb of Surtess becomes double-width. |   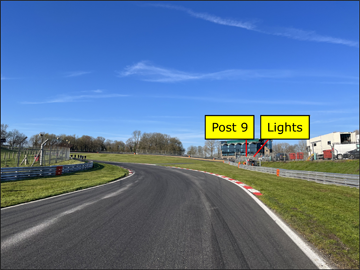  |
 Marshal Post 22: Clearways This post may be used instead of Post 10 and was on my previous two visits. It is in the driver’s eyeline and so more visible. Having exited Surtees and started to steer right for Clearways, this post can be seen ahead. It is on the outside, left, of the circuit, by the GP return road. Ahead, across the GP return road and to the right of Post 22, is a red flag repeater light. |    |
 Marshal Post 23: Clearways Rounding Clearways, the large hospitality building appears ahead, on the outside, left, of the circuit. This post is located just before. Be careful of red flags, especially if your first view of it is here, as the pit entry is directly ahead, where you may be directed. |    |
 Marshal Post 24: by Pit Lane Entry Rounding Clearways, one comes across the pit entry lane on to the right. Passing this one sees the armco that separates the race circuit from the pit entry. At the end of this, by the concrete pit wall, is this post. By and in front of the marshal post is a red flag repeater light. |     |
 Marshal Post 25: Start Finish Straight Exiting Clark Curve onto the start finish straight, this post can be seen ahead, on the left of the circuit, just before the grandstand. |    |
Go to guide for configuration:
You can download a pdf version of this page here:
GP Configuration
Not all marshal posts are necessarily in use. As a minimum, each post should be visible to the marshals at the next post, in both directions. For example, Post 10 can see posts 9 and 11.
The green flag lap is a sighting lap and one of its intended uses is for the driver to learn the position of all manned posts.
Above is a map of the circuit, showing the marshal posts for this configuration. Below, they are described in more detail.
Please note that the positions are a guideline only. Whilst every effort has been made to ensure accuracy, there may be mistakes or updates since the guide was created. Any feedback is appreciated.
In summary, while not guaranteeing perfection, I have identified the post positions. Again, note that not all posts may be in use. Also, since writing, posts may have been moved or added. This is just a guide, but hopefully a useful guide.
 Marshal Post 1: Start / Finish Line On the left, at the very end of the concrete section of the pit wall, by the second of two white lines that cross the circuit. Just ahead, atop a gantry, are the start lights. | |
 Marshal Post 3: Paddock Hill Bend Opposite the pit lane exit is the marshal post’s repeater lights. The post itself is a very short distance later, on the same (left) side and just over the brow of the hill It is at the start of the gravel trap. Visually, the driver’s focus will be towards the apex of Paddock Hill Bend, so take care to spare a moment to look left. | |
 Marshal Post 4: Hailwoods Hill Having exited Paddock Hill Bend, there is an expanse of grass on the right. The post is located where the armco returns to by the track. | |
 Marshal Post 5: Druids Entry On passing under the bridge, the next post can be seen ahead, on the left, at the end of the armco. This is by the turn-in point. Marshal post’s repeater lights are located to the left, just after the bridge. | |
Marshal Post 6: Druids Exit Rounding Druids, the Post 6 is opposite Post 5. It can be seen ahead from the apex of Druids. It is on the outside of the circuit. | |
 Marshal Post 7: Graham Hill Bend Exiting Druids, this post can be clearly seen at the bottom of the hill, to the right of the track. It is opposite the entry to Graham Hill Bend. By the marshal post is a red flag repeater light. | |
 Marshal Post 8: Cooper Straight Exiting Graham Hill Bend and looking ahead, there is an access road to the right. Beyond that, opposite the entry to the left-hand curve, is this post. | |
 Marshal Post 9: Surtees Entry Heading towards Surtees, this post can be seen in the distance, on the right. It is positioned after the circuit starts to bend to the left so, even though it is by the armco, it is set back a little. It is opposite the point where the apex kerb of Surtess becomes double-width. | |
 Marshal Post 10: Surtees Exit While apexing Surtees, this post can be seen directly ahead, on the right of the circuit. It is across a short strip of gravel, as the rubberised barrier approaches the circuit There are a further five marshal posts along this straight, two of the left and one on the right before a bridge, then two on the left, the last on the outside of Hawthorns corner. |   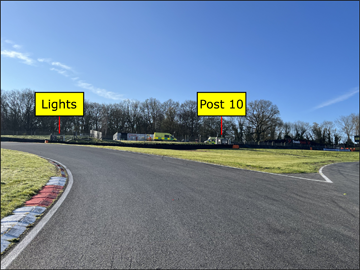  |
 Marshal Post 11: Crest of Hill Only a short distance, from the previous post, due to being atop the crest of a hill. As you pass the previous post, look ahead, to your left. The photographs were taken while the Indy configuration was in use. |    |
 Marshal Post 12: Pilgrims Drop A similarly short distance ahead as was the previous post, this post is on the left, immediately after the gentle curve to the right. The photographs were taken while the Indy configuration was in use. |    |
 Marshal Post 13: Before the Bridge On the right just before the bridge. It is at the end of the armco, where the rubberised barrier that leads to the bridge begins. |    |
 Marshal Post 13a: After the Bridge After the bridge, this post can be seen ahead, halfway down the bridge. |    |
 Marshal Post 14: Hawthorns Entry This post can be seen in plenty of time as you approach Hawthorns. It is at the end of the straight, on the left, just after the gravel trap begins. This is the last of the six marshal posts along the preceding straight. |    |
 Marshal Post 15: Hawthorns Exit This is a long corner and this post appears ahead in the driver’s eyeline towards the end of the apex. It is on the left at the very end of the gravel trap that covers this corner. |    |
 Marshal Post 16: Westfield Entry Seen ahead, on the left, a touch after the turn-in point for the corner. It is just before the gravel trap. |    |
 Marshal Post 17: Westfield Exit / Dingle Dell Having turned into Westfield and hit the apex, this post will appear ahead in the eyeline as you leave the apex. It is at the end of the gravel trap, just before the track dips. |    |
 Marshal Post 18: Sheene Curve Entry From Dingle Dell exit, there is another right-hand curve before Sheene Curve. That is quite a gap after the previous onrush of posts. I write this to point out that you haven’t missed a post. This post is hidden by trees, so you’ll only notice it when you see the waved flags. It is on the left, opposite the early part of the apex. |     |
 Marshal Post 19: Stirlings Approach As the track straightens, this post is ahead, on the right, alongside the “1” countdown marker post. |  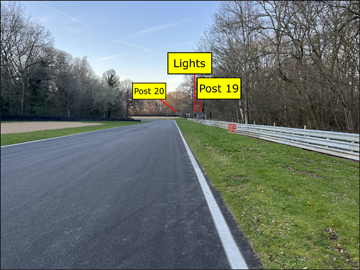  |
 Marshal Post 20: Stirlings Exit As you begin to turn into Stirlings, look across the Apex and, across the gravel trap, you will see this post. It is to the right of the track, opposite the end of the apex kerb. |   |
 Marshal Post 21: Stirling - Bridge Having exited Stirlings, look ahead to the left side of the track, around halfway to the bridge, and you will see this post. |    |
 Marshal Post 22: After the Bridge As you pass under the bridge, look to the right and you will see this post. The post is just before the section of track that links the Indy configuration from Surtees/McLaren to Clearways, which is ahead. The photographs were taken while the Indy configuration was in use. |    |
 Marshal Post 23: Clearways Rounding Clearways, the large hospitality building appears ahead, on the outside, left, of the circuit. This post is located just before. Be careful of red flags, especially if your first view of it is here, as the pit entry is directly ahead, where you may be directed. The photographs were taken while the Indy configuration was in use. |    |
 Marshal Post 24: by Pit Lane Entry Rounding Clearways, one comes across the pit entry lane on to the right. Passing this one sees the armco that separates the race circuit from the pit entry. At the end of this, by the concrete pit wall, is this post. By and in front of the marshal post is a red flag repeater light. | |
 Marshal Post 25: Start Finish Straight Exiting Clark Curve onto the start finish straight, this post can be seen ahead, on the left of the circuit, just before the grandstand. | |
Go to guide for configuration:
You can download a pdf version of this page here:
Buy the PDF

This Marshal Post guide is available as a downloadable PDF at a very reasonable price. Click the thumbnail to view it in the store.

A Complete Guide of this venue is also available, which includes all of the above guides. Click the thumbnail to view it in the store.
You can also click this thumbnail to view all the available PDFs in the shop.
Page updated by Peter Tattersall, August 2025