The different configurations are detailed separately, and are
300 Configuration
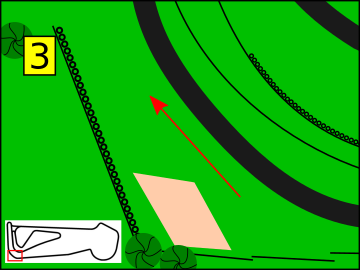
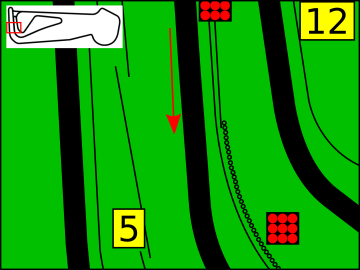
Not all marshal posts are necessarily in use. As a minimum, each post should be visible to the marshals at the next post, in both directions. For example Post 3 can see posts 2 and 4.
The green flag lap is a sighting lap and one of its intended uses is for the driver to learn the position of all manned posts.
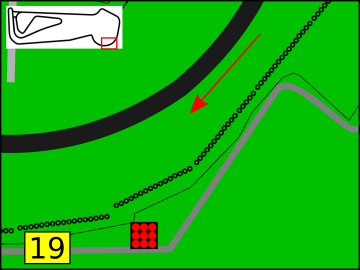
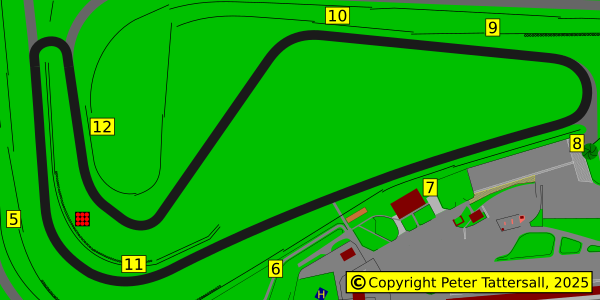
Above is a map of the circuit, showing the marshal posts for all configurations. Below, they are described in more detail.
 Marshal Post 1: Pitlane Exit On the inside. Immediately after the end of the pitlane wall. Looking to the right, there is a gap in the armco to allow access from the paddock. On the other side of the gap is this post. | 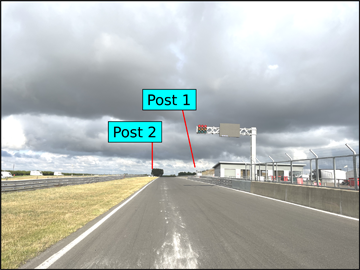 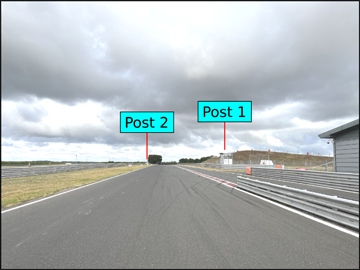 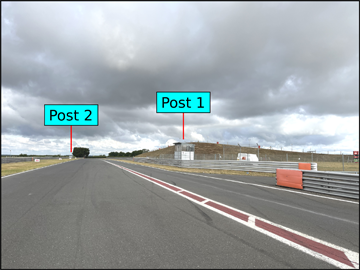 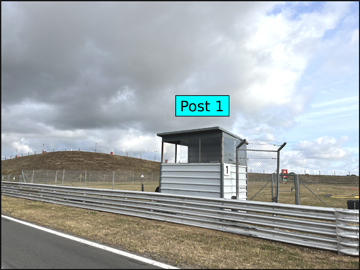 |
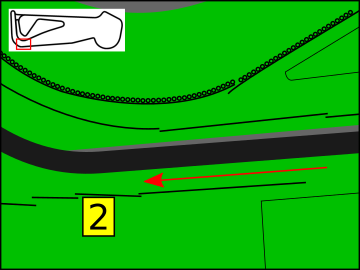
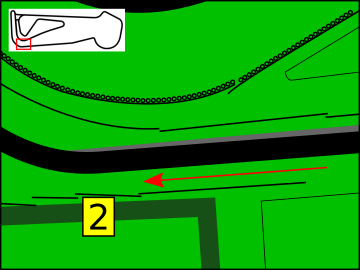 Marshal Post 2: Riches In Opposite the very end of the pitlane exit, just as the broken white line merges into the apex kerb. | 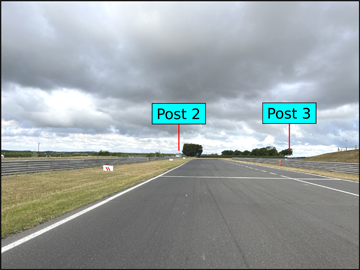 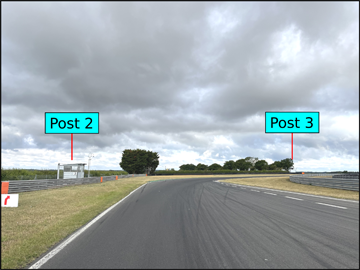 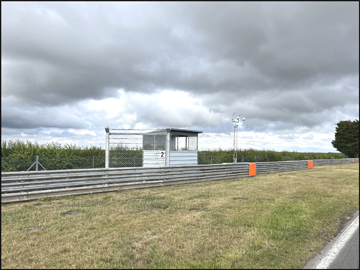 |
 Marshal Post 3: Riches Out Opposite the very end of the apex kerb. It is also at the end of the tyre wall. | 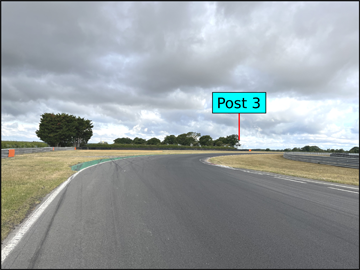 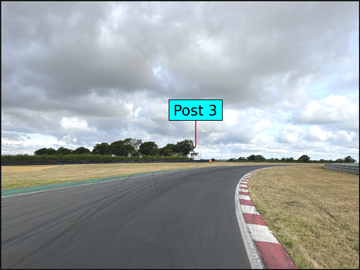  |
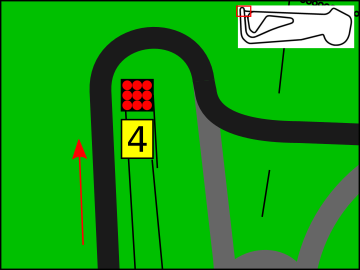
 Marshal Post 4: Wilson In On the inside (right) of the circuit, just before the head of the hairpin. Ahead of the marshal post is a flag repeater light. | 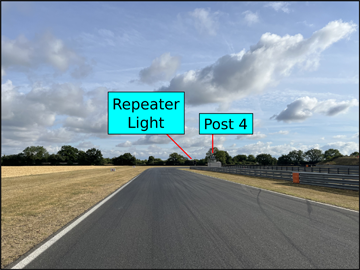  |
 Marshal Post 5: Palmer In On the right of the circuit, just after the point at which the track begins to turn. Opposite the marshal post is a flag repeater light. | 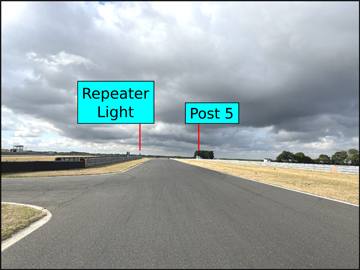 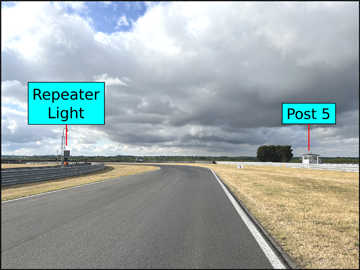 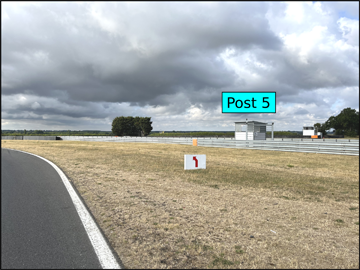 |
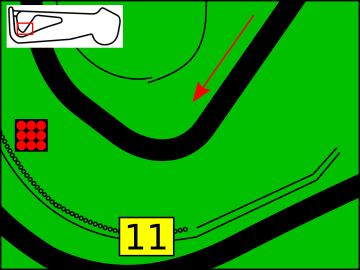
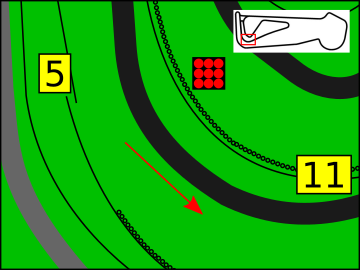
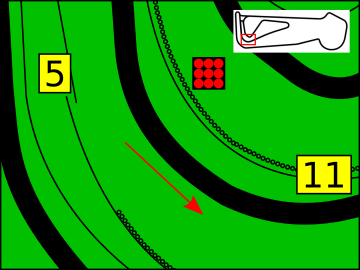 Marshal Post 11: Oggies This post can be seen on the inside (left) of the circuit, just after Palmer’s apex. It serves Oggies corner and so can be disregarded when exiting Palmer. I mention it here for two reasons: 1. Without doing so may cause confusion when it is seen from this point. 2. I have seen a Marshal Post web site describing this as Post 6; it is not, as that comes next… | 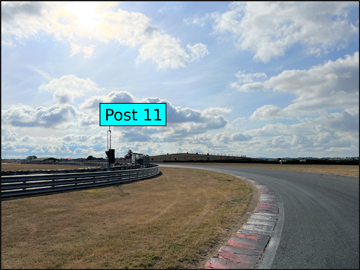 |
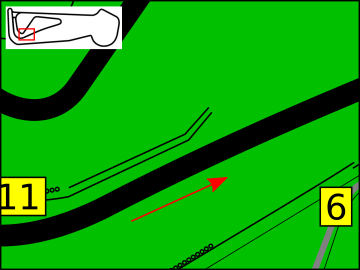 Marshal Post 6: Palmer Out On the right just after the end of the exit kerb and, opposite, the armco barrier. This post is most in the eyeline when at Palmer’s apex, where the driver may be looking further ahead, or may have a leading car blocking the view. Care is therefore especially important here. | 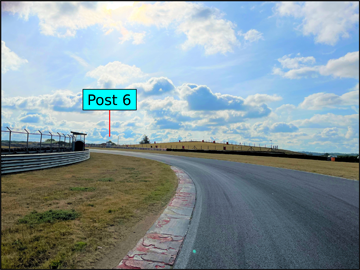 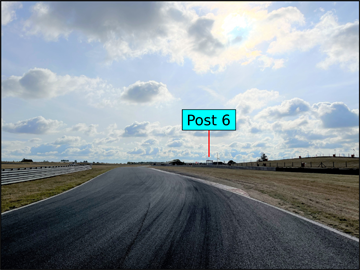 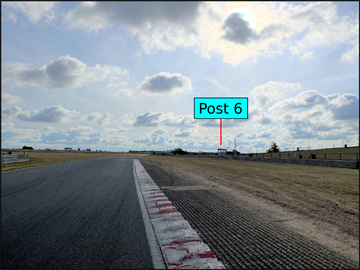  |
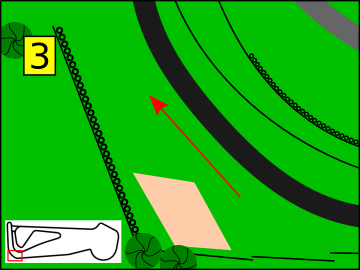
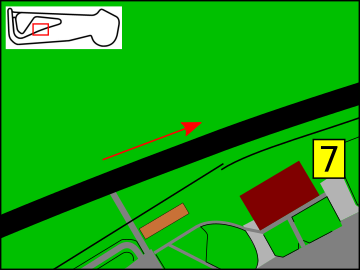 Marshal Post 7: Tyrrells It is located on the right just after, Tyrrells Restaurant. | 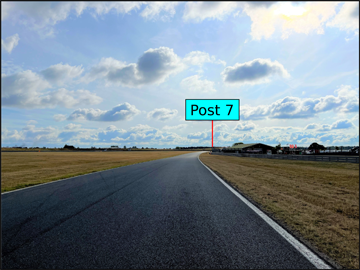 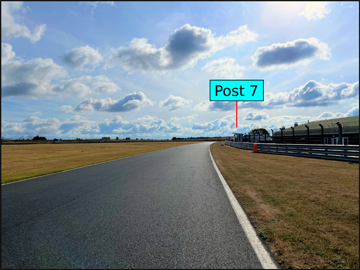 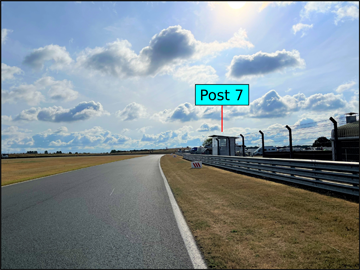 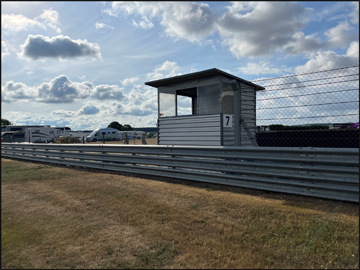 |
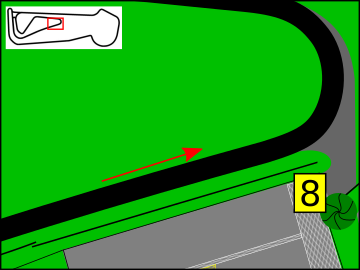 Marshal Post 8: Agostini In On the outside just after the turn-in point for the hairpin. There is an access road immediately after. |  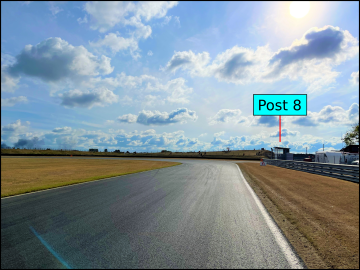 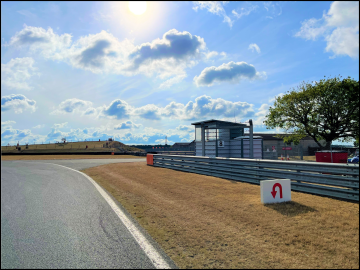 |
 Marshal Post 9: Agostini Out On the outside, right, just after the end of the exit kerbing. You will see another marshal post before this, which can be seen as you look across the apex as you are turning in. That should be ignored as it serves the Bentley Straight. Even on approach to Marshal Post 9, post 10 can be seen in the distance. | 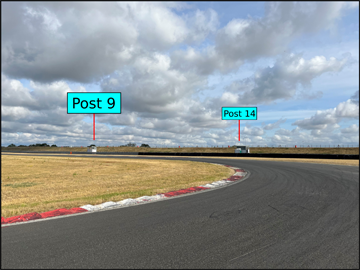 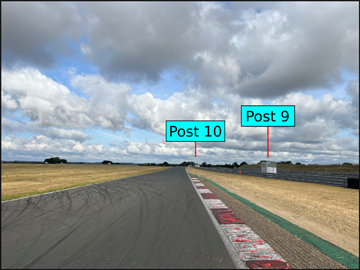  |
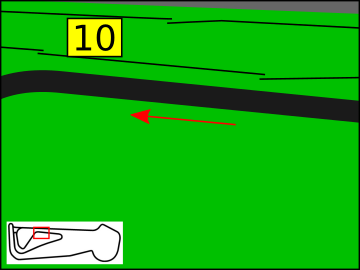
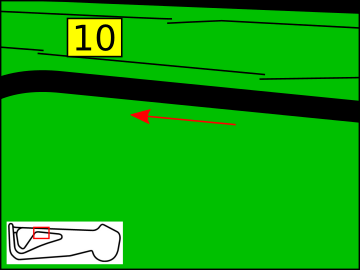 Marshal Post 10: Hamilton On the outside, right, after the track has straightened. Shortly before the end of the barrier. | 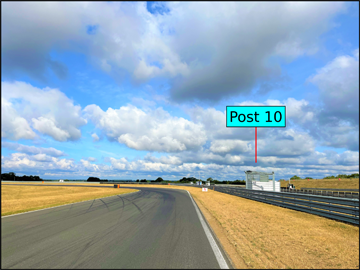  |
 Marshal Post 11: Oggies Having exited Hamilton, this post can be seen ahead, to the left. It is opposite the apex of Oggies. Visually, it is to the left of a small group of trees, with the repeater light being to the right. This can be used as a reference on approach to Hamilton. | 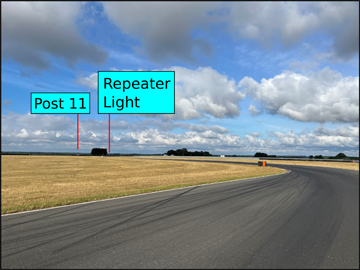 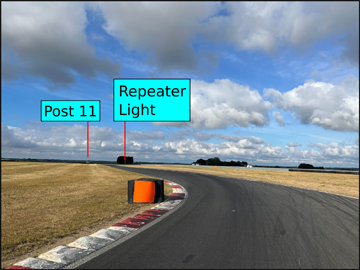 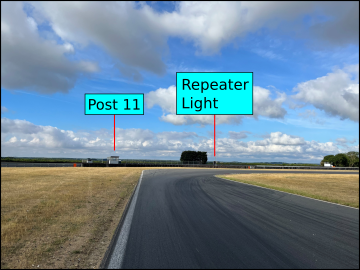 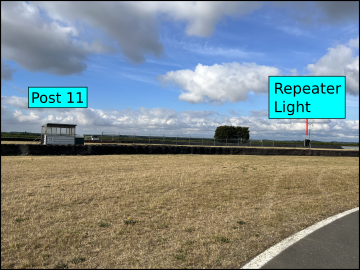 |
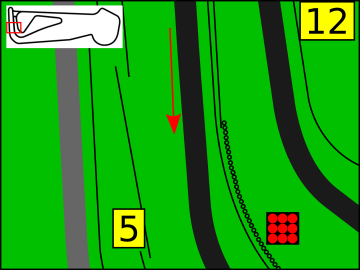
 Marshal Post 12: Williams When between the two Oggies apexes, this post can be seen ahead, to the right. It is almost midway between corners Oggies and Williams. Opposite the marshal post is a flag repeater light. | 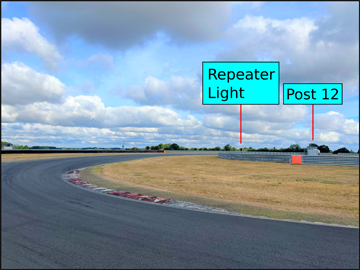 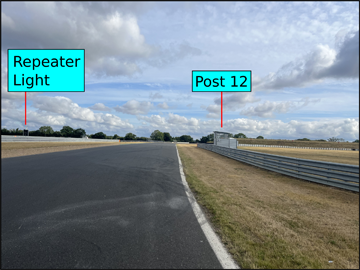  |
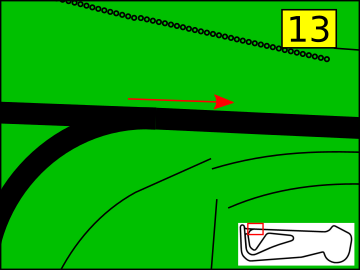 Marshal Post 13: Start of Bentley Straight When at the apex of Williams, this post can be seen straight ahead. It is at the end of the exit kerb, on the left. | 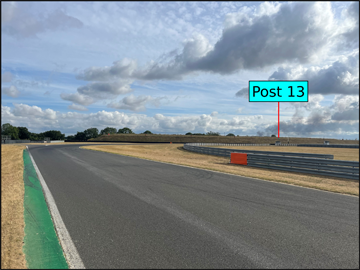 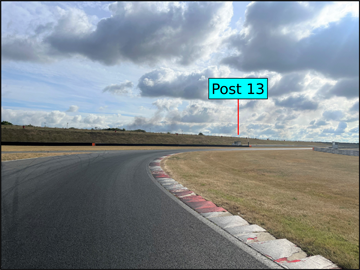 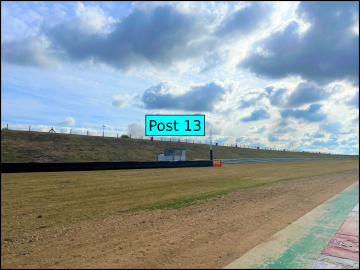 |
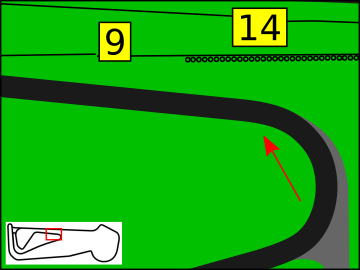
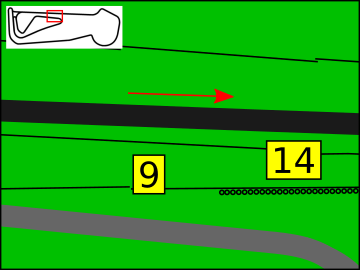
 Marshal Post 14: Centre of Bentley Straight To the right of the track. The post should be easily spotted, as it is very close to the edge of the track. Between Marshal Posts 13 and 14 are two posts (10, then 9) that serve the previous straight between corners Agostini and Hamilton. | 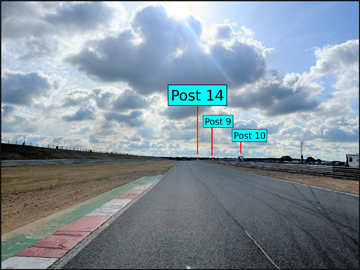 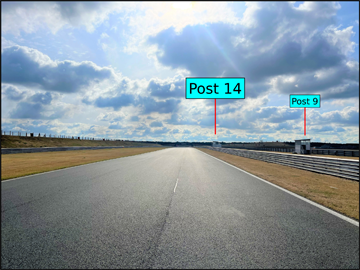 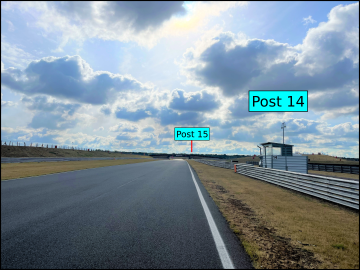 |
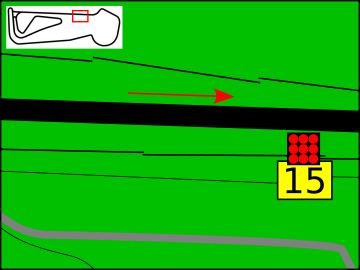 Marshal Post 15: Brundle (Formerly Esses In) Before the bridge, on the right. By the marshal post is a flag repeater light. | 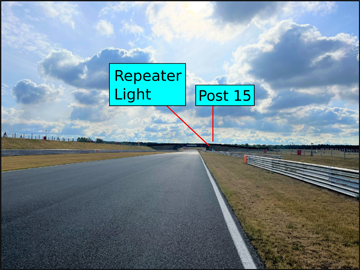 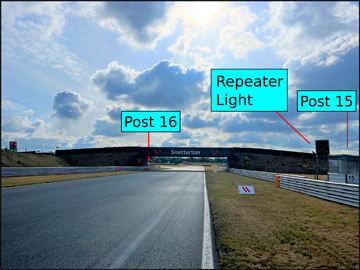 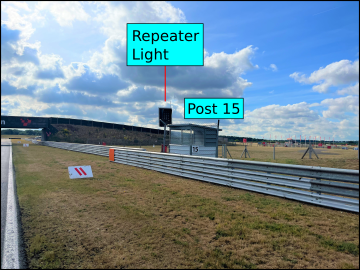 |
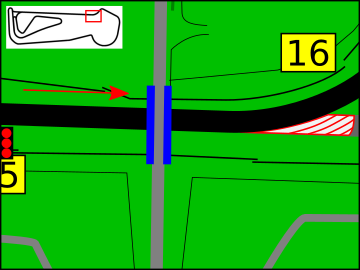 Marshal Post 16: Nelson (Formerly Esses Out) On the apex of Brundle, on the left. This post is difficult to miss, but to see it early takes a little care, as it is after the bridge. As you pass under the bridge, look to the left of the end of the armco. | 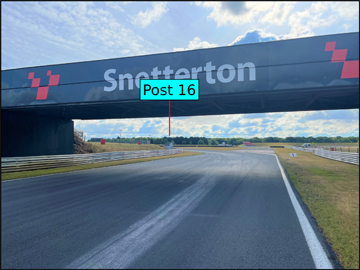 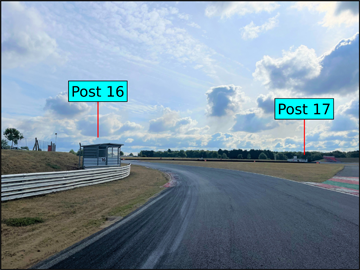 |
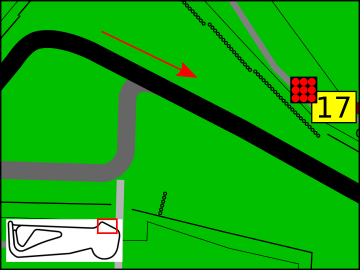 Marshal Post 17: Bomb Hole In As you start to turn into Nelson, the preceding corner, and look across, inside the apex, the flag repeater light can be seen. The post is located on the outside left, just before the entry to Bomb Hole. It is towards the end of the tyre wall, just before the start of the armco barrier and a grandstand. By the marshal post is a flag repeater light. |  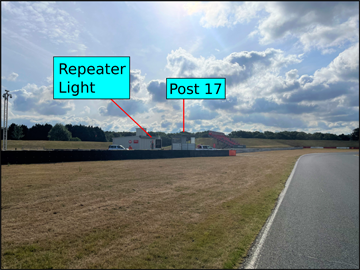 |
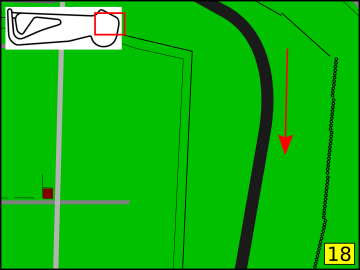 Marshal Post 18: Bomb Hole Out This post can be difficult to spot, because it is set so far back, on the outside left of the track. Depending on the line taken, it can be seen straight ahead as the driver comes to the end of the apex kerb. | 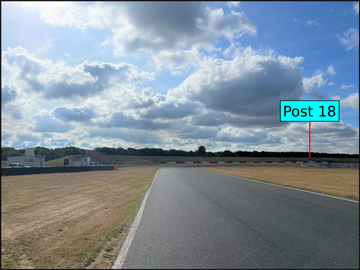 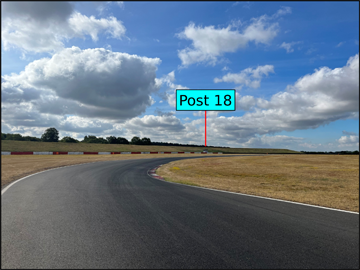 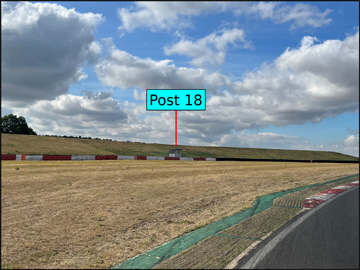 |
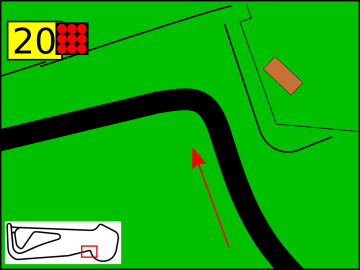
 Marshal Post 19: Coram In the straight between Bomb Hole and Coram, look into the distance, to the right of Coram’s apex, where the post’s repeater light can be seen. The post is on the outside left of the track, quite far back. Opposite the centre of the apex kerbing. Before the marshal post is a flag repeater light. At the time of writing, from a distance, a tree could just be seen slightly to the right of this light. | 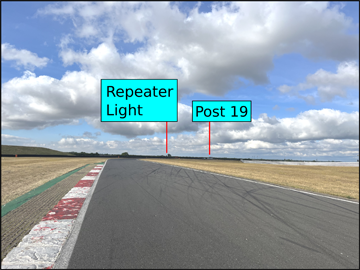 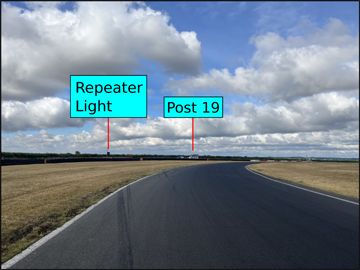 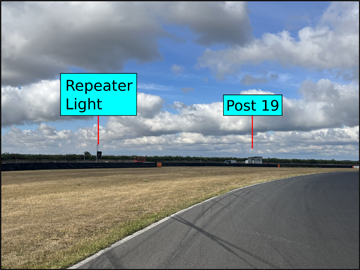 |
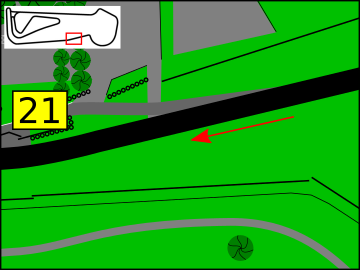
 Marshal Post 20: Murrays As you continue steering right through the last part of Coram, the knoll by Agostini corner can be seen in the distance. Looking towards the right base of that hillock, this post’s repeater light can be seen. When at the apex of Russell, the post can be seen ahead. It is after the exit of Murrays, to the right, just before the start of the armco. By the marshal post is a flag repeater light. | 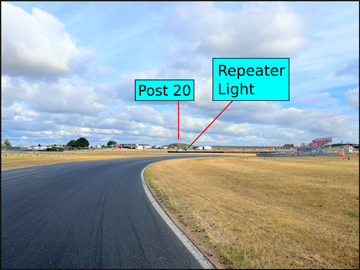 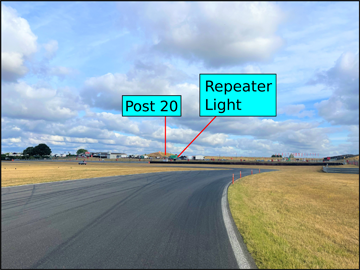 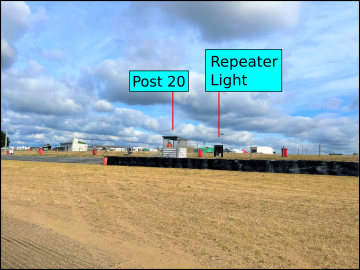 |
 Marshal Post 21: Pit Lane Entry On the island between the pit lane entry and the track, just before the start of the pit wall. | 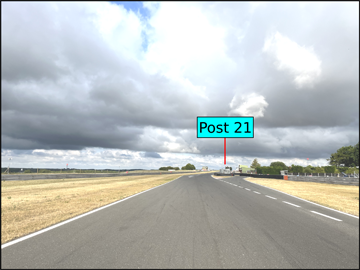 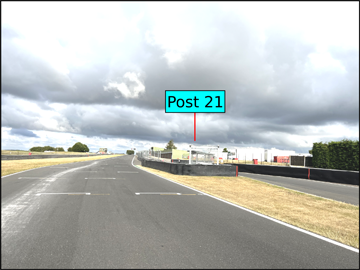  |
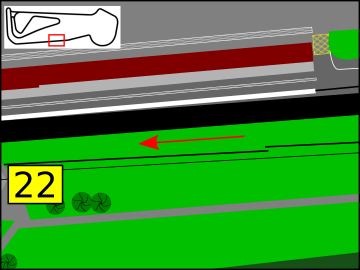 Marshal Post 22: Senna The timekeeper’s building can be clearly seen on the outside, left, alongside the Start/Finish line. The post is a short distance before. | 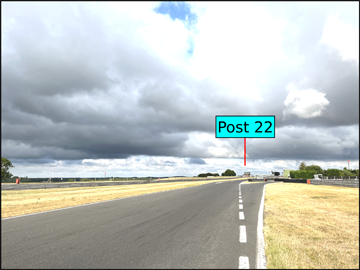 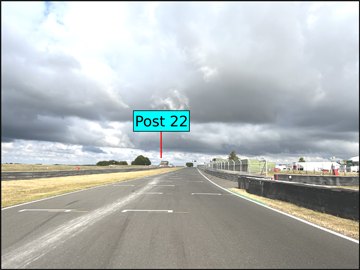 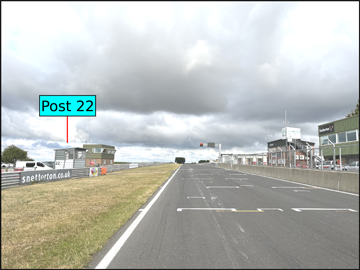 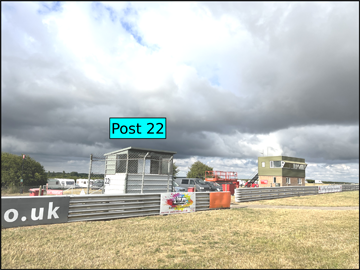 |
You can download a pdf version of this page here:
Go to guide for configuration:
200 Configuration
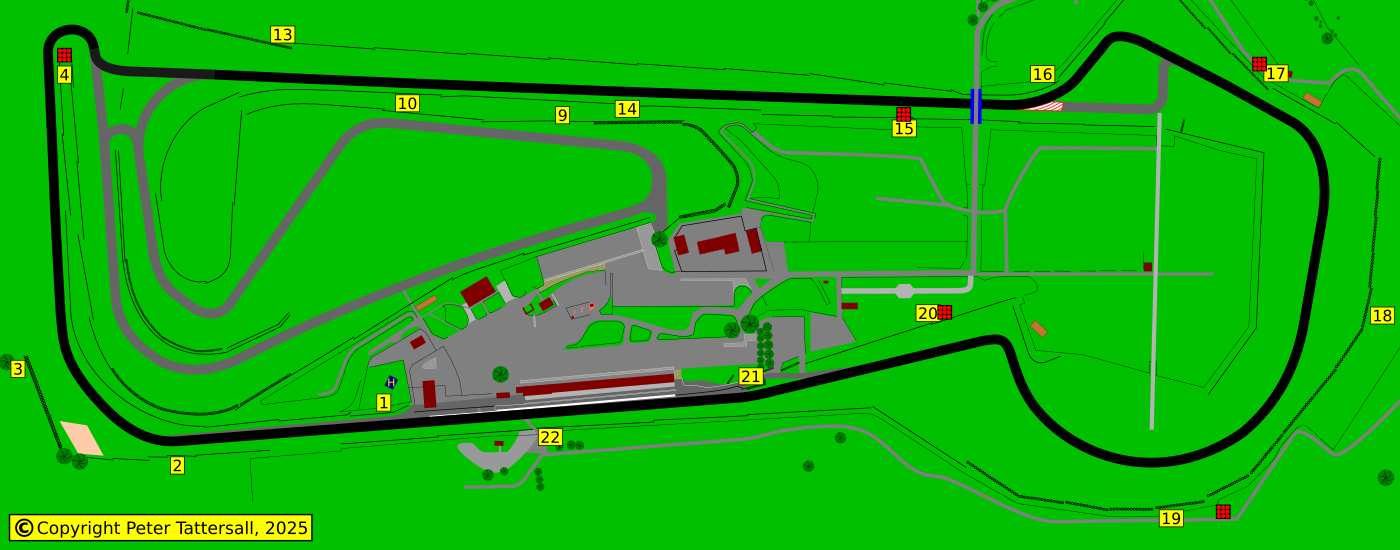
Not all marshal posts are necessarily in use. As a minimum, each post should be visible to the marshals at the next post, in both directions. For example Post 3 can see posts 2 and 4.
The green flag lap is a sighting lap and one of its intended uses is for the driver to learn the position of all manned posts.
Above is a map of the circuit, showing the marshal posts for all configurations. Below, they are described in more detail.
Marshal Post 1: Pitlane Exit On the inside. Immediately after the end of the pitlane wall. Looking to the right, there is a gap in the armco to allow access from the paddock. On the other side of the gap is this post. | |
 Marshal Post 2: Riches In Opposite the very end of the pitlane exit, just as the broken white line merges into the apex kerb. | |
 Marshal Post 3: Riches Out Opposite the very end of the apex kerb. It is also at the end of the tyre wall. | |
 Marshal Post 4: Wilson In On the inside (right) of the circuit, just before the head of the hairpin. Ahead of the marshal post is a flag repeater light. | |
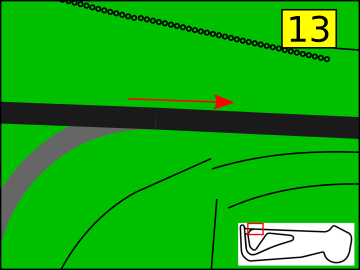 Marshal Post 13: Start of Bentley Straight When at the apex of Williams, this post can be seen straight ahead. It is at the end of the exit kerb, on the left. | |
 Marshal Post 14: Centre of Bentley Straight To the right of the track. The post should be easily spotted, as it is very close to the edge of the track. Between Marshal Posts 13 and 14 are two posts (10, then 9) that serve the previous straight between corners Agostini and Hamilton. | |
Marshal Post 15: Brundle (Formerly Esses In) Before the bridge, on the right. By the marshal post is a flag repeater light. | |
Marshal Post 16: Nelson (Formerly Esses Out) On the apex of Brundle, on the left. This post is difficult to miss, but to see it early takes a little care, as it is after the bridge. As you pass under the bridge, look to the left of the end of the armco. | |
Marshal Post 17: Bomb Hole In As you start to turn into Nelson, the preceding corner, and look across, inside the apex, the flag repeater light can be seen. The post is located on the outside left, just before the entry to Bomb Hole. It is towards the end of the tyre wall, just before the start of the armco barrier and a grandstand. By the marshal post is a flag repeater light. | |
Marshal Post 18: Bomb Hole Out This post can be difficult to spot, because it is set so far back, on the outside left of the track. Depending on the line taken, it can be seen straight ahead as the driver comes to the end of the apex kerb. | |
Marshal Post 19: Coram In the straight between Bomb Hole and Coram, look into the distance, to the right of Coram’s apex, where the post’s repeater light can be seen. The post is on the outside left of the track, quite far back. Opposite the centre of the apex kerbing. Before the marshal post is a flag repeater light. At the time of writing, from a distance, a tree could just be seen slightly to the right of this light. | |
Marshal Post 20: Murrays As you continue steering right through the last part of Coram, the knoll by Agostini corner can be seen in the distance. Looking towards the right base of that hillock, this post’s repeater light can be seen. When at the apex of Russell, the post can be seen ahead. It is after the exit of Murrays, to the right, just before the start of the armco. By the marshal post is a flag repeater light. | |
Marshal Post 21: Pit Lane Entry On the island between the pit lane entry and the track, just before the start of the pit wall. | |
Marshal Post 22: Senna The timekeeper’s building can be clearly seen on the outside, left, alongside the Start/Finish line. The post is a short distance before. | |
The different configurations are detailed separately, and are
100 Configuration
Not all marshal posts are necessarily in use. As a minimum, each post should be visible to the marshals at the next post, in both directions. For example Post 8 can see posts 7 and 9.
The green flag lap is a sighting lap and one of its intended uses is for the driver to learn the position of all manned posts.
Above is a map of the circuit, showing the marshal posts for all configurations. Below, they are described in more detail.
Marshal Post 7: Tyrrells It is located on the right just after, Tyrrells Restaurant. | |
Marshal Post 8: Agostini In On the outside just after the turn-in point for the hairpin. There is an access road immediately after. | |
Marshal Post 9: Agostini Out On the outside, right, just after the end of the exit kerbing. You will see another marshal post before this, which can be seen as you look across the apex as you are turning in. That should be ignored as it serves the Bentley Straight. Even on approach to Marshal Post 9, post 10 can be seen in the distance. | |
 Marshal Post 10: Hamilton On the outside, right, after the track has straightened. Shortly before the end of the barrier. | |
Marshal Post 11: Oggies Having exited Hamilton, this post can be seen ahead, to the left. It is opposite the apex of Oggies. Visually, it is to the left of a small group of trees, with the repeater light being to the right. This can be used as a reference on approach to Hamilton. | |
Marshal Post 12: Williams When between the two Oggies apexes, this post can be seen ahead, to the right. It is almost midway between corners Oggies and Williams. Opposite the marshal post is a flag repeater light. | |
 Marshal Post 5: Palmer In On the right of the circuit, just after the point at which the track begins to turn. Opposite the marshal post is a flag repeater light. | |
 Marshal Post 11: Oggies This post can be seen on the inside (left) of the circuit, just after Palmer’s apex. It serves Oggies corner and so can be disregarded when exiting Palmer. I mention it here for two reasons: 1. Without doing so may cause confusion when it is seen from this point. 2. I have seen a Marshal Post web site describing this as Post 6; it is not, as that comes next… | |
Marshal Post 6: Palmer Out On the right just after the end of the exit kerb and, opposite, the armco barrier. This post is most in the eyeline when at Palmer’s apex, where the driver may be looking further ahead, or may have a leading car blocking the view. Care is therefore especially important here. | |
The different configurations are detailed separately, and are
Buy the PDF
This Marshal Post guide is available as a downloadable PDF at a very reasonable price. Click the thumbnail to view it in the store.
A Complete Guide of this venue is also available, which includes all of the above guides. Click the thumbnail to view it in the store.
You can also click this thumbnail to view all the available PDFs in the shop.
Page updated by Peter Tattersall, October 2025